Download and Installation #
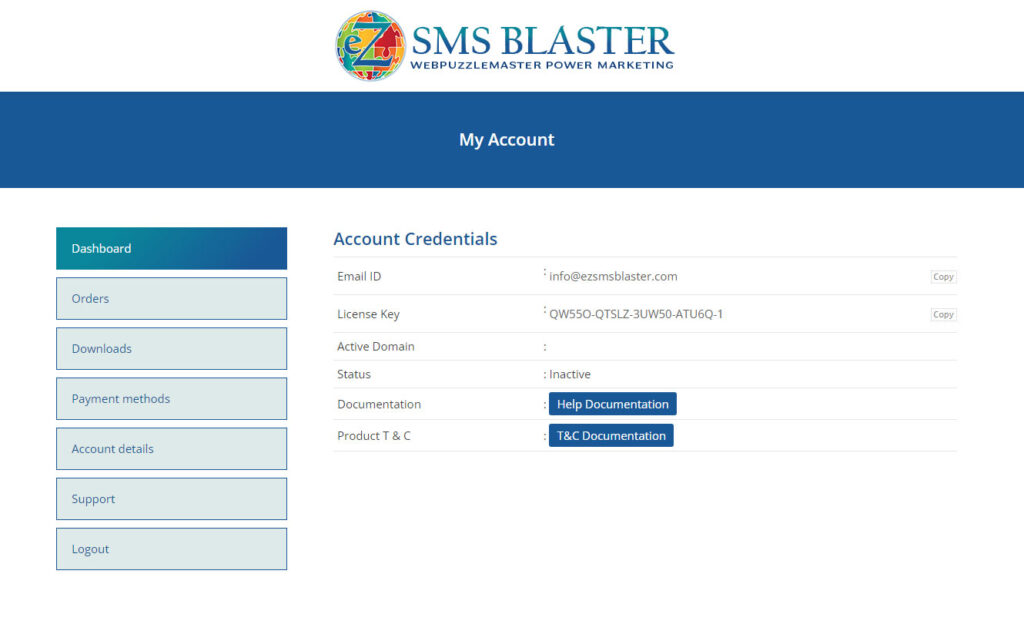
After purchasing eZ SMS Blaster WordPress Plugin, you can log in to your account, download the latest version of eZ SMS Blaster, and access help documentation, support, and more.
How to Download #
Installing eZ SMS Blaster Plugin #
- Step 1 – Login to the WordPress admin of your website.
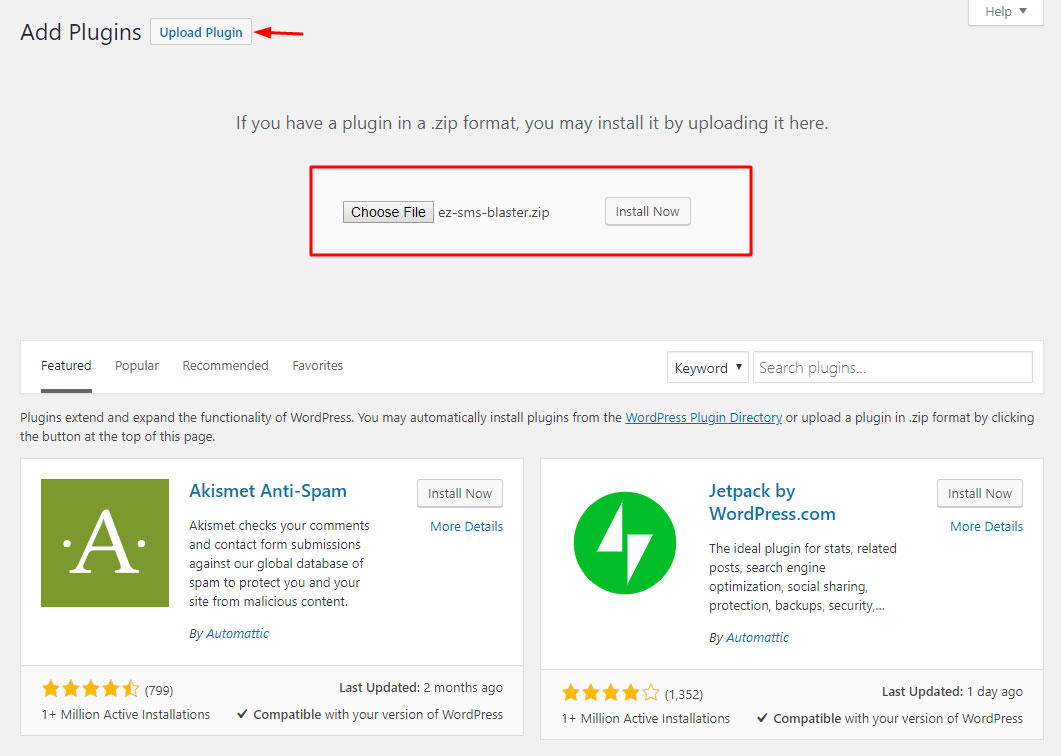
- Step 2 – Go to plugins and click on add new.
- Step 3 – Upload the plugin as a zipped file.
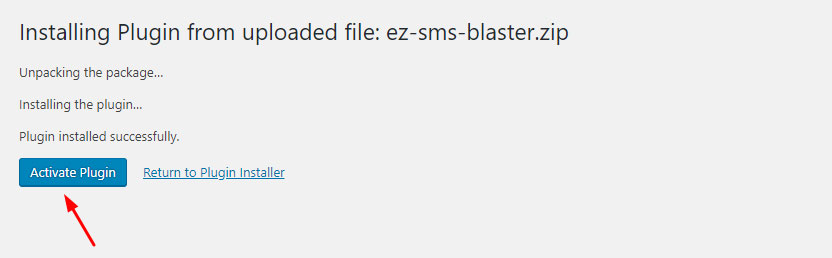
- Step 4 – Activate the plugin to make it available in your WordPress admin.

STEP 1 and 2 – Login, go to plugins and add new
STEP 4 – Activate
Set Your Site Time Zone #
Set your correct time zone in WordPress to allow your SMS to be delivered at a time consistent with your time zone. In your WordPress admin, go to general under settings and find time zone. From the drop-down menu, select a city that corresponds to your correct time zone. Click the save changes button.

Configure Cron Jobs #
Configure two Cron jobs to send SMS for general purposes and for birthdays. Learn how to configure a Cron Job at https://blog.cpanel.com/how-to-configure-a-cron-job/
- General purpose SMS Cron Job: https://yourdomainname.com/wp-json/ez-json/v1/cron/schedule.
- Birthday SMS Cron Job: https://yourdomainname.com/wp-json/ez-json/v1/cron/birthday
Configure General Settings #
- Enter all countries where you wish to send SMS. You will need to have a verified number to send international SMS. Note: only one verified number can be added, either for the US as a local or toll-free number, or international.
- Enter your company name (40 characters or less). Your domain and company name will display as the sender at the bottom of your opt-in form terms & conditions
- The subscriber opt-in message is not editable. Your subscribers see this when they opt into one of your lists.
- Cron jobs: These are set up in your website server (cPanel if available) and allow you to send SMS at the correct dates and times (see more info below).
- Receive delivery report: If you’re sending a high volume of SMS, your server needs to be able to handle a high traffic volume. Send a support ticket via your account if you have questions or need assistance.
- Twilio is the only carrier that is available at this time. You will need to set up a Twilio account, buy, and get verified for either a local or toll-free number depending on your usage goals. Complete the appropriate credential fields in the plugin settings (see more info below).

Configure Twilio SMS Carrier Account #
- Unlike most other SMS carriers, Twilio allows for the use of SMS for lead generation provided you can demonstrate that you are sending to double opt-in subscribers. Other carriers do not permit SMS in the US for lead generation.
- Twilio offers SMS phone numbers for the US and international countries. If your goal is to send Internationally, the verified number will restrict you to approved countries only. Each country or region may have different requirements.
- The plugin supports only a single number with associated credentials so you need to choose either the US or international where the plugin is installed. You may purchase additional licenses for use on a sub-domain or different domain should you require more than one number.
- The two types of numbers include A2P 10DLC and toll-free. The A2P 10DLC numbers are for marketing in a local region and require a branding and verification process. Toll-free numbers can be used for the sending of nationwide SMS and MMS. These numbers also require verification.
Learn more about A2P 10DLC at https://www.youtube.com/watch?v=KWvbRToRnGg. Learn more about toll-free at https://www.youtube.com/watch?v=hqhl0Yr9MAM&t=7s. - Assistance is available for those needing help with account setup and verification. Learn more at https://ezsmsblaster.com/add-on-services/
Twilio Account Setup #
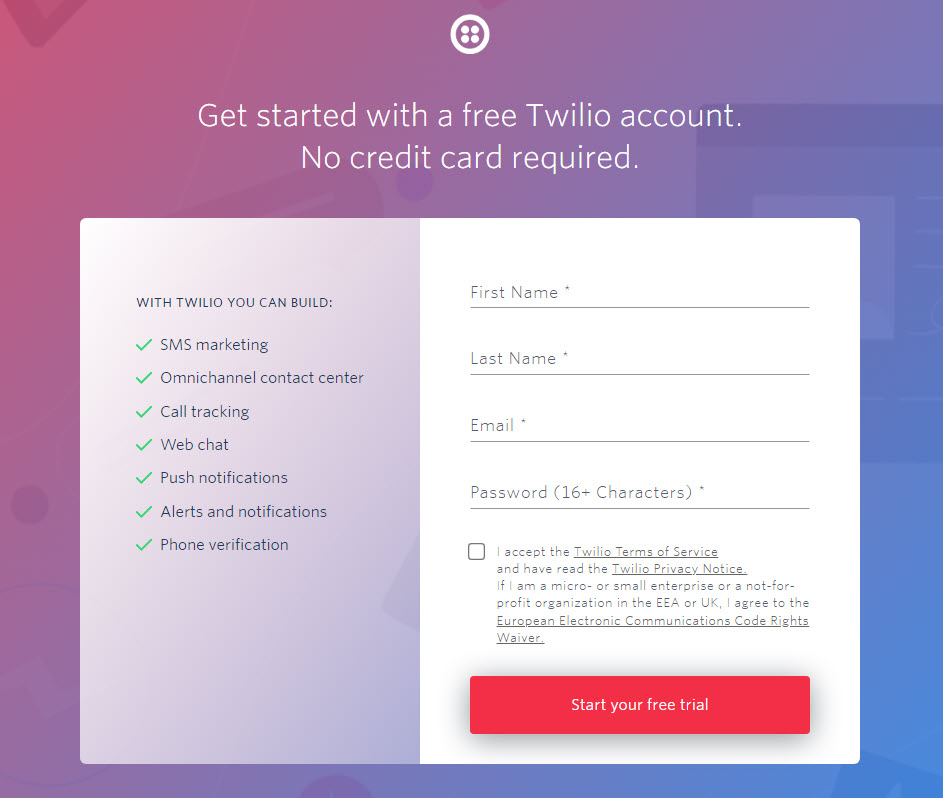
- Sign up for your free Twilio trial account at https://www.twilio.com/try-twilio
Choose Type of Number #
All SMS carriers require that users sending SMS in the U.S. purchase a number that must be verified and approved by the carrier. The A2P 10DLC numbers are for marketing in a local region and require a branding and verification process. Toll-free numbers can be used for the sending of nationwide SMS and MMS. These numbers also require verification.
10DLC numbers:
https://www.youtube.com/watch?v=KWvbRToRnGg
More about Toll-Free numbers:
https://www.youtube.com/watch?v=hqhl0Yr9MAM&t=7s
More help with carrier set up and number verification is available at https://ezsmsblaster.com/add-on-services/.
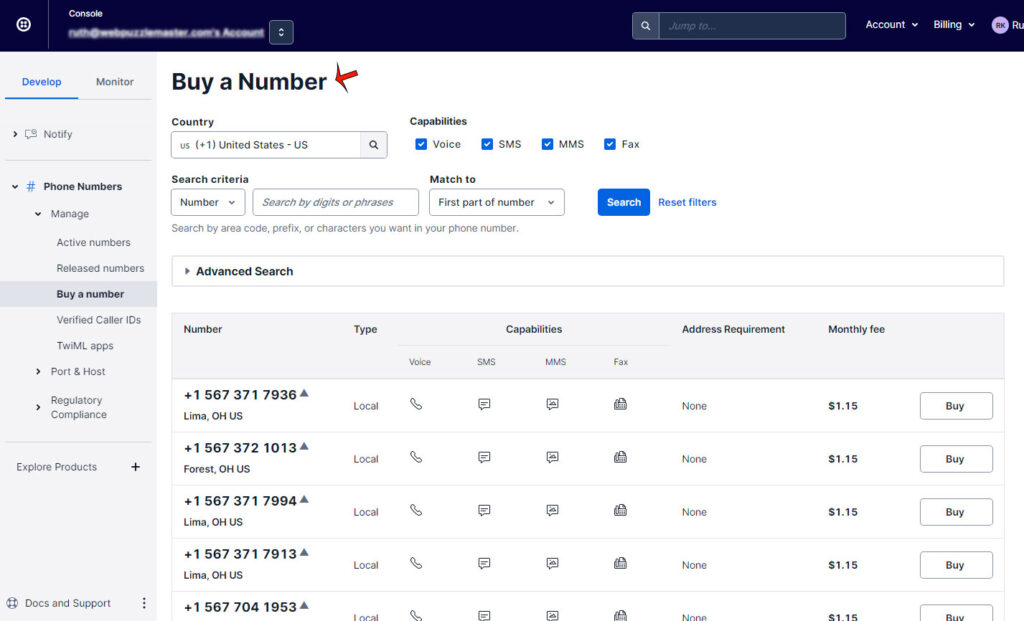
Buy a Local or Toll-Free Number #
https://console.twilio.com/us1/develop/phone-numbers/manage/incoming
Get Number Verified #
Get Twilio Credentials #
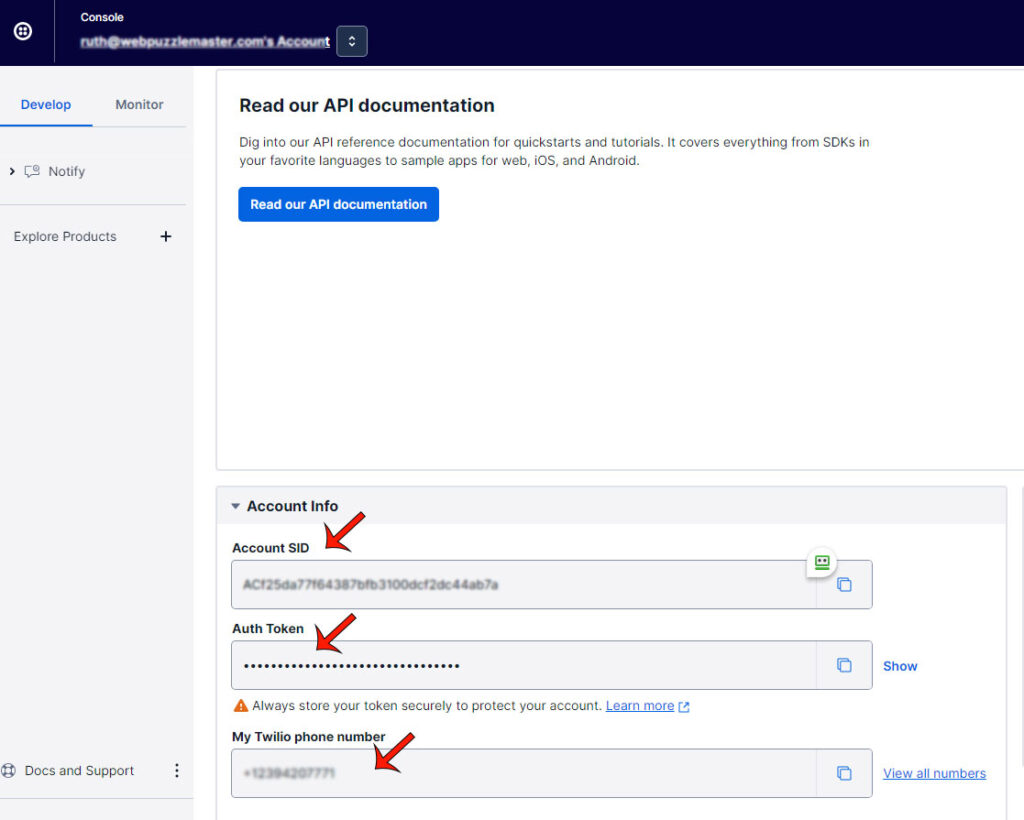
Get Twilio Credentials (Number, API SID, Auth Token) at https://www.twilio.com/console and add your credentials to the plugin’s general settings for Twilio.
Enter Credentials #
Enter Credentials in general settings including
-
- Twilio Phone Number (include country code with no spaces or dashes)
- Twilio API SID
- Twilio Auth Token
Add Your Webhook URL #
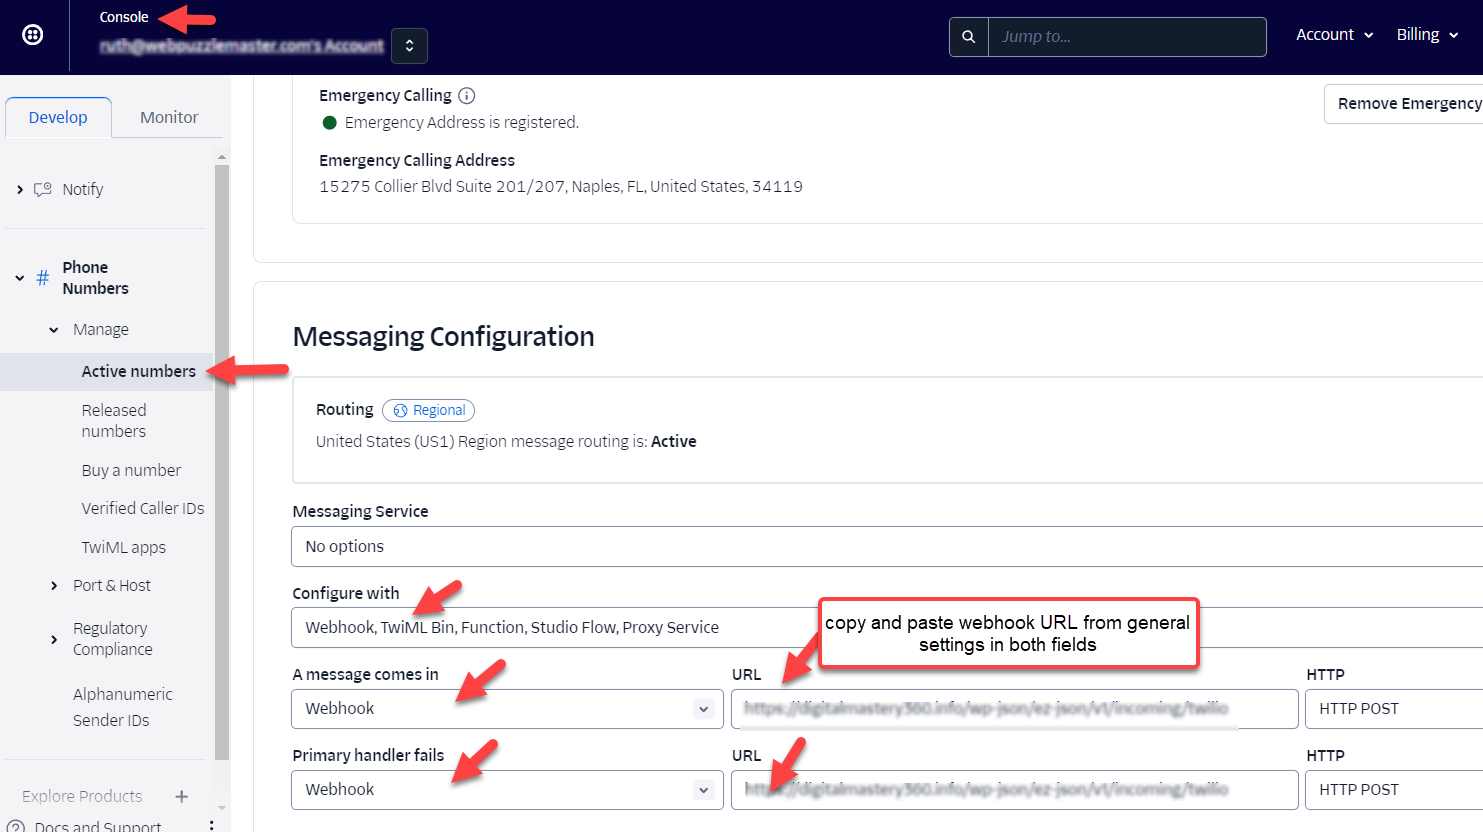
Your webhook allows you to receive SMS and a delivery report. Your Webhook URL will display in general settings and will include your domain name where the plugin is installed. It will look like https://yourdomainname.com/wp-json/ez-json/v1/incoming/twilio.
- To add Your Webhook URL
- Go to this link in your console and click on active numbers.
- Select active number (should be verified)
- Scroll to messaging configuration.
- Under Configure with, you should see Webhook, TwiML Bin, Function, Studio Flow, Proxy Service
- Copy and paste your webhook URL from your settings in both webhook fields.
- Save.
OpenAI API KEY #
If you want to use AI messaging, you will need to sign up for a chatGPT (OpenAI) account at https://chatgpt.com/
- Once you are logged in, get an API key from this page: https://platform.openai.com/api-keys
- Paste your API key in the general settings field labeled OpenAI API KEY
- When your usage exceeds a certain number of credits, you will be prompted to purchase additional credits or sign up for a monthly subscription. Please note that this is separate from a paid subscription for the use of chatGPT. You can continue to use a free chatGPT account and elect to pay only for API credits as needed or by subscription.
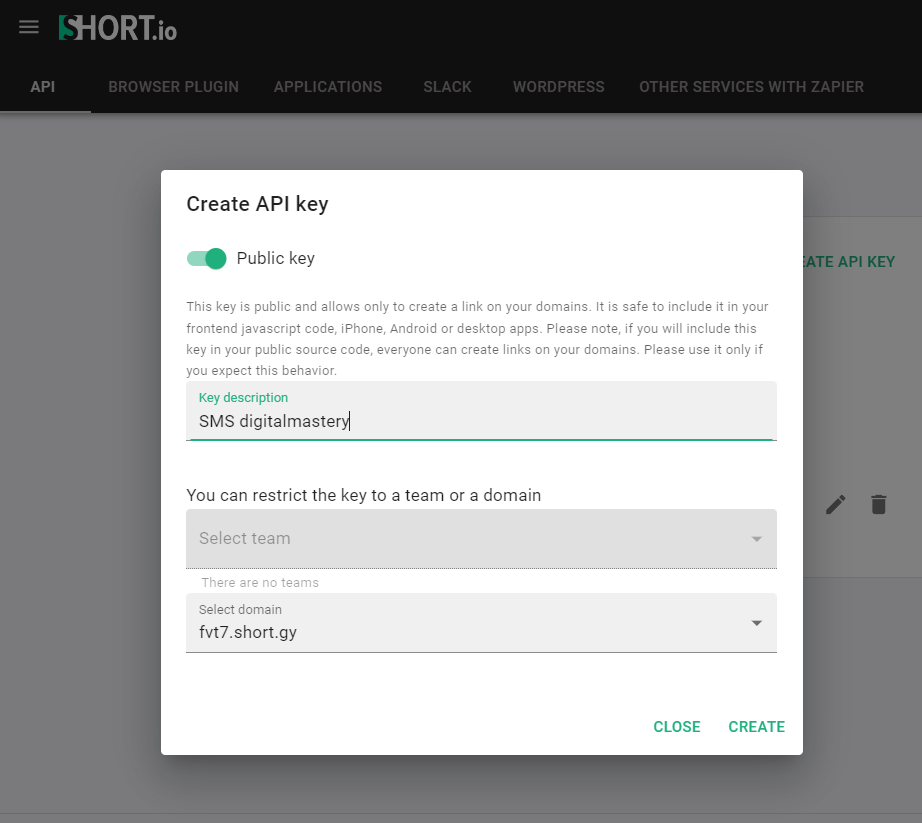
Minified URL (Short.io) Public Key #
- Sign up for a free Short.io account to minify your links (URLs) at https://app.short.io/public/register
- A free URL is provided and is all that is needed to work with eZ SMS Blaster.
- Custom domains are available for purchase should you wish to use a branded short URL for your links.
- Enter your Short.io API key in general settings.
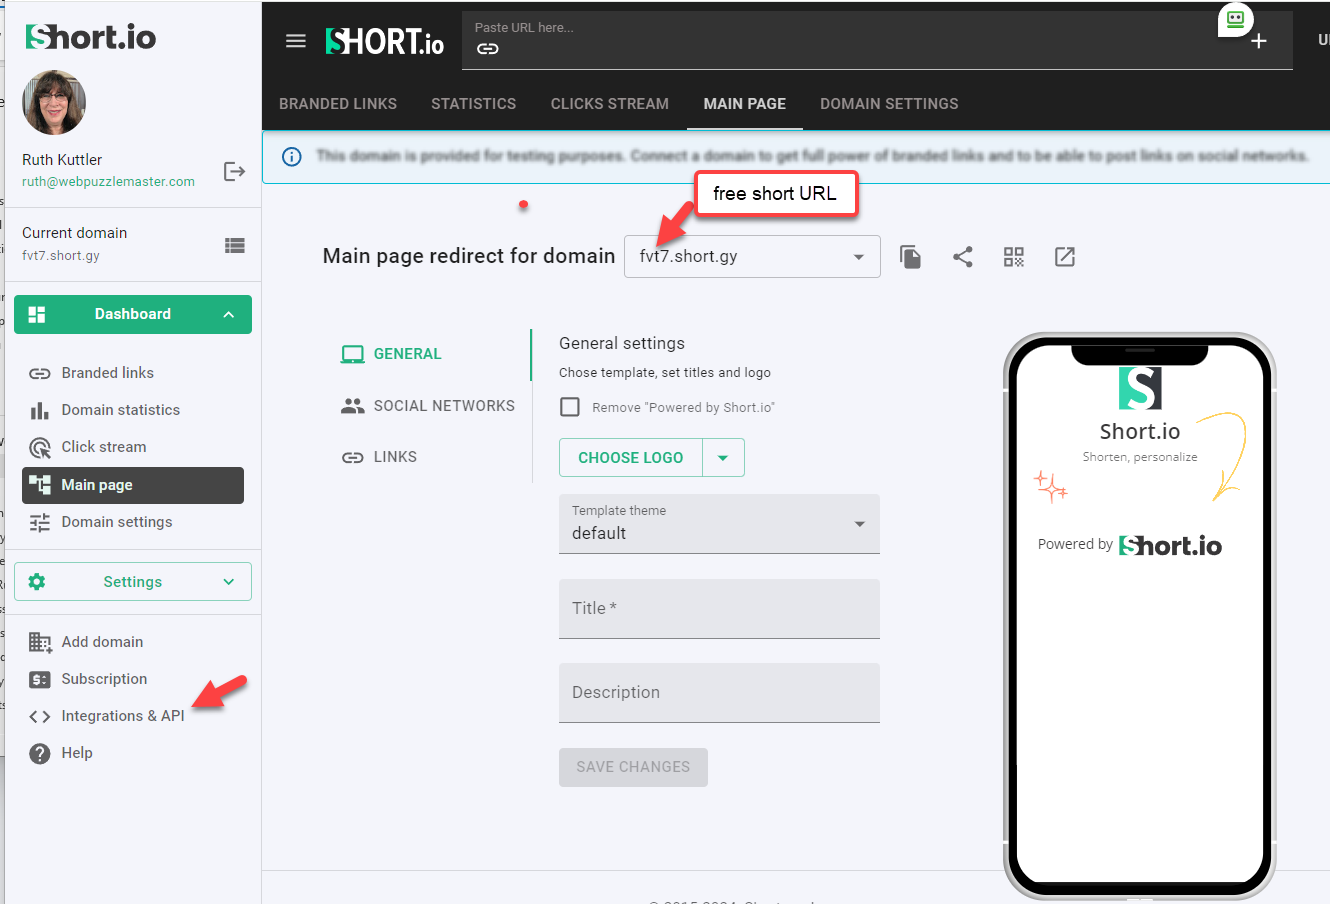

Be sure to click the SAVE button to save your settings.
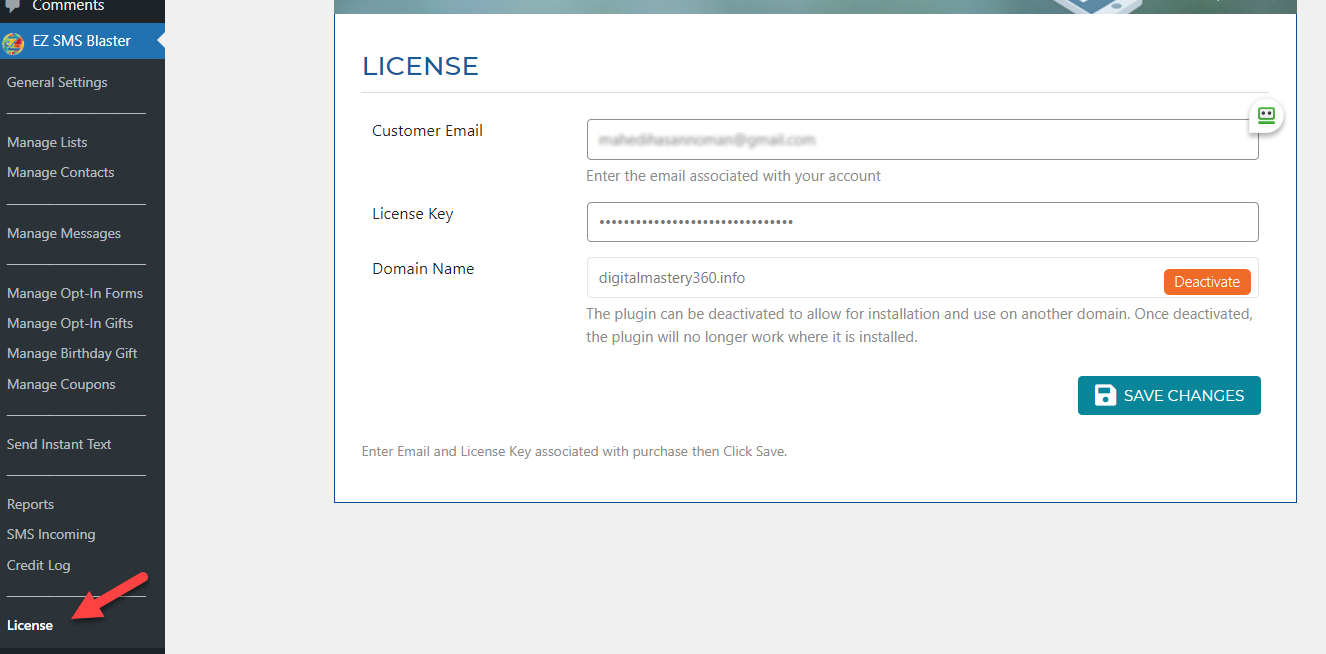
License Info #
- Enter the email that you used to purchase the plugin.
- Copy and paste the license key from your purchase documents sent by email and available in your account after logging in.
- The domain where the plugin is installed displays in the Domain Name field and cannot be edited. If you wish to use the plugin on a different domain where WordPress is installed, click the deactivate button and reinstall on the alternate domain. Please be aware that data from your current installation (contacts, list, etc) will be purged and not recoverable.
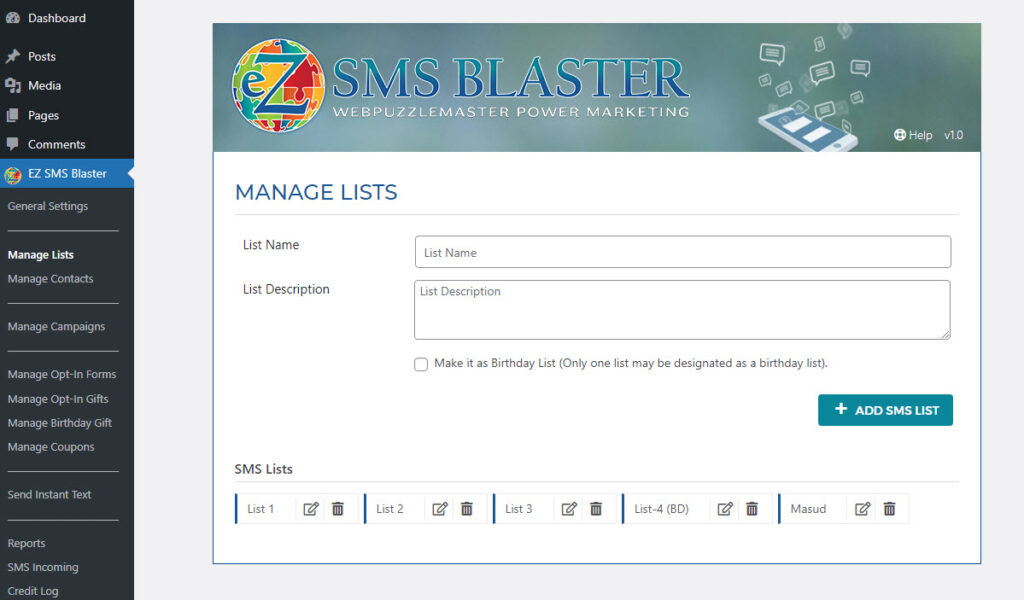
Manage Lists #
Easily create any number of targeted lists. Once a list is created, you have options to edit or delete the list. To create a list:
- Complete the list name and description fields.
- Click the Add SMS List button.
- Any one of your lists may be designated as a birthday list for use with a birthday opt-in form with fields for the month and day of the subscriber’s birthday. The birthday form with an optional incentive digital gift can build a large list rapidly. It automatically sends the SMS message and gift on the subscriber’s birthday. The birthday list, form, and gift are all managed within the plugin.
- To edit a list, click the pencil icon. Make changes to the list name and description as desired. Then click the update list button to save. Reload the page to view edited list changes.
- To delete a list, click the trash can icon to the right of the list. Please note that deleting a list will delete all contacts within that list.
Lists will be available throughout each part of the plugin to support the association of a list with contacts, campaigns, opt-in forms, etc.
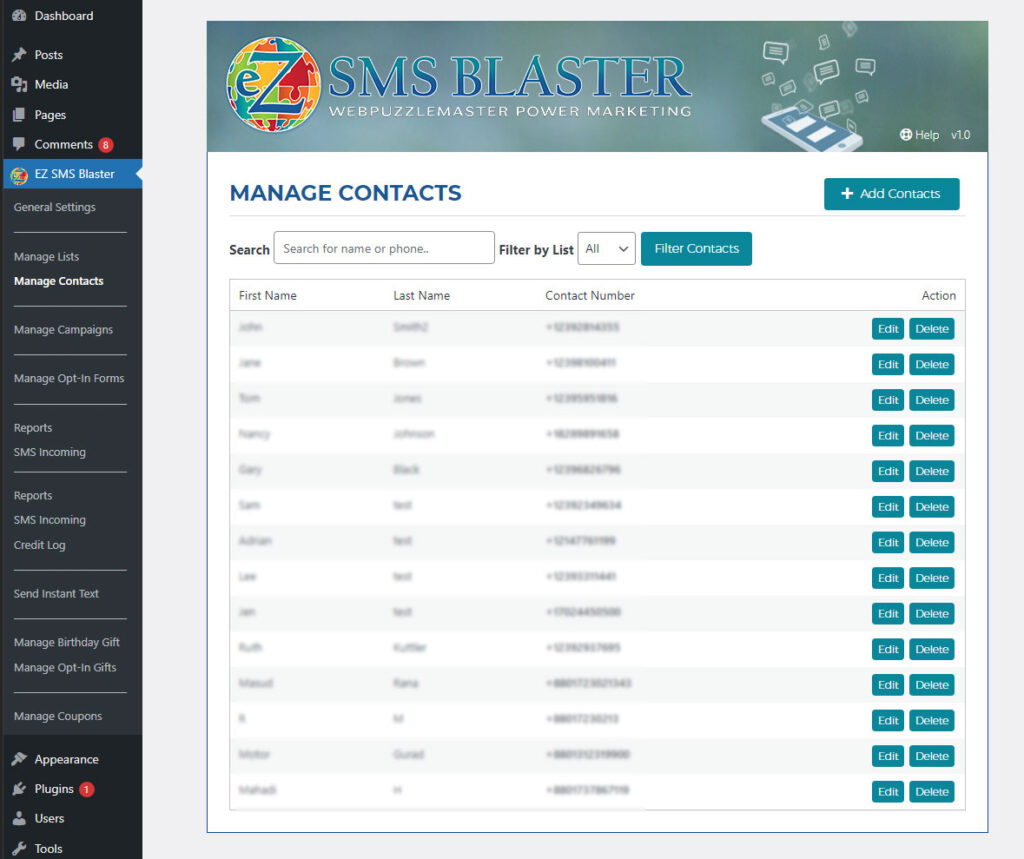
Manage Contacts #
The initial screen of managing contacts provides a list of all contacts entered. Above the listings, you may filter contacts by a specific list or search for a contact by name or phone number. Contacts edited or deleted from the ALL list, will apply to ALL contacts in ALL lists. Contacts edited or deleted from a specific list will only apply to that list. The plugin provides options to add first and last name fields to contacts to personalize SMS messages. To add contacts, click the add contacts button on the top right of this screen.
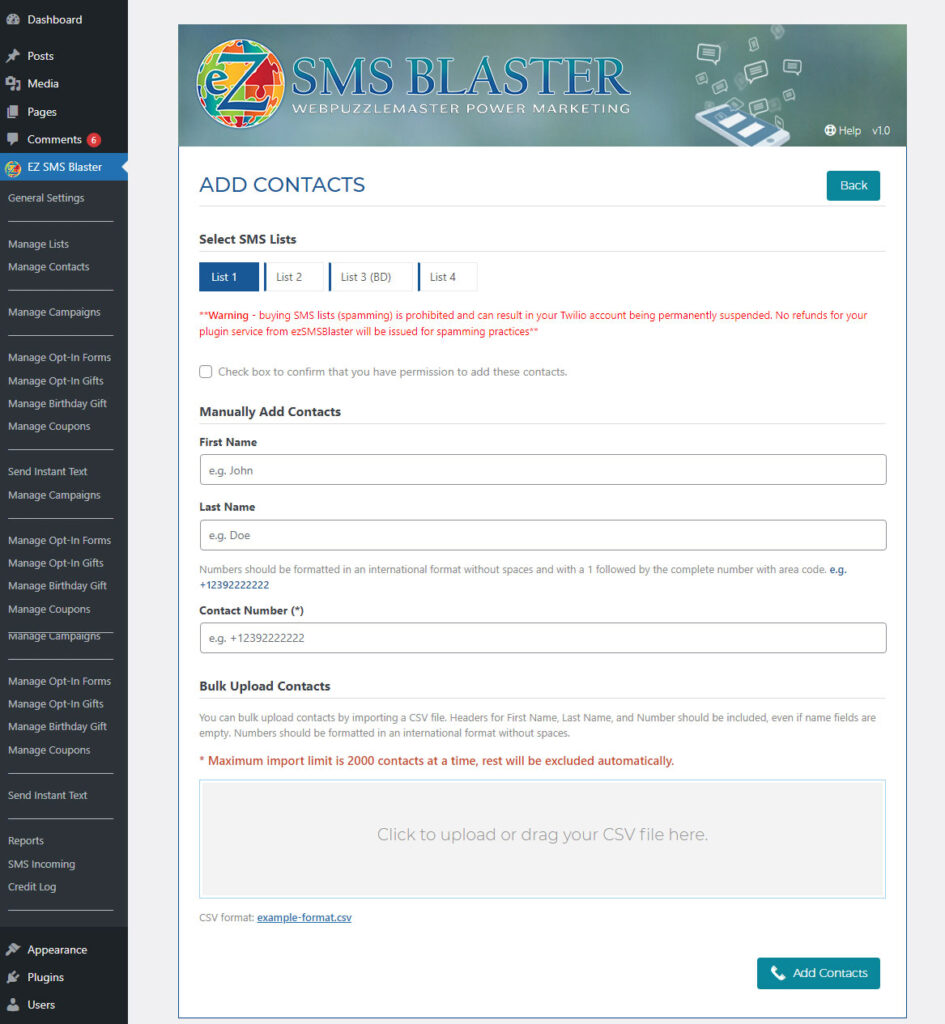
Add Contacts #
Contacts may be added to a list manually one at a time, or by importing a bulk list as a CSV file.
- Begin by selecting the list where you want to add contacts. You may only add contacts to one list at a time.
- Check the box to confirm that you have permission to add the contacts. **Warning – buying SMS lists (spamming) is prohibited and can result in your SMS account being permanently suspended. No refunds for your plugin service from ezSMSBlaster will be issued for spamming practices**
Manually Adding Contacts
- If adding the contacts manually, complete optional name fields and required phone number in the correct format (international format without spaces. e.g. +12392222222) for each contact and save.
Bulk Adding Contacts
- If adding a bulk list of contacts, prepare a CSV file with First Name, Last Name, and Phone headers, even if the name fields are empty. Format the phone number in the correct format (international format without spaces. e.g. +12392222222)
- * Maximum import limit is 2000 contacts at a time; the rest will be excluded automatically. Drag or upload your CSV file into the bulk add space and save.
- Click the Add Contacts button. Be patient as the process may take some time to complete. When all numbers are added, the system will display a DONE message.
Filter Contacts #
Use advanced filters under manage contacts to find, edit, and remove contacts from single, multiple, or all lists. Find contacts by name, number, and/or list. Note: the mobile number with country code is the only required field. Other fields are highly recommended for easy subscriber management and personalization.
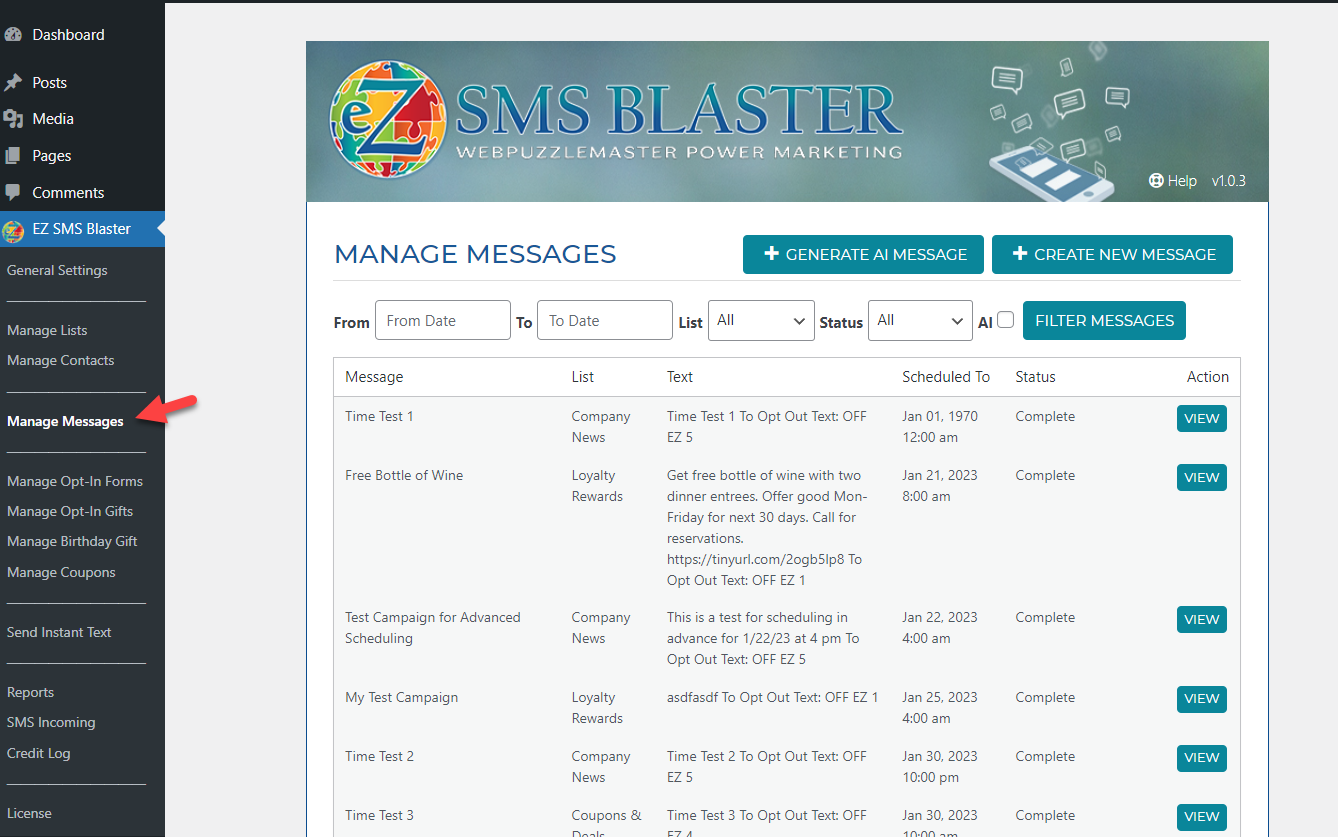
Manage Messages #
- Please note that our previous use of campaigns has been changed to messages. This avoids confusion with SMS carrier’s use of campaigns for categories and billing purposes.
- The initial screen of Manage Messages provides you with a paginated list of all messages including name of the message, list name, text message, scheduled date and time, status (scheduled, running, complete), and a button to view delivery data for completed messages.
- The view button for completed campaigns links to delivery details including campaign name, number of texts sent, success rate, invalid contacts, number failed to deliver, number blocked by user/carrier, and number of credits used.
- Above message data, messages can be filtered for a specific date range, list, and/or status.
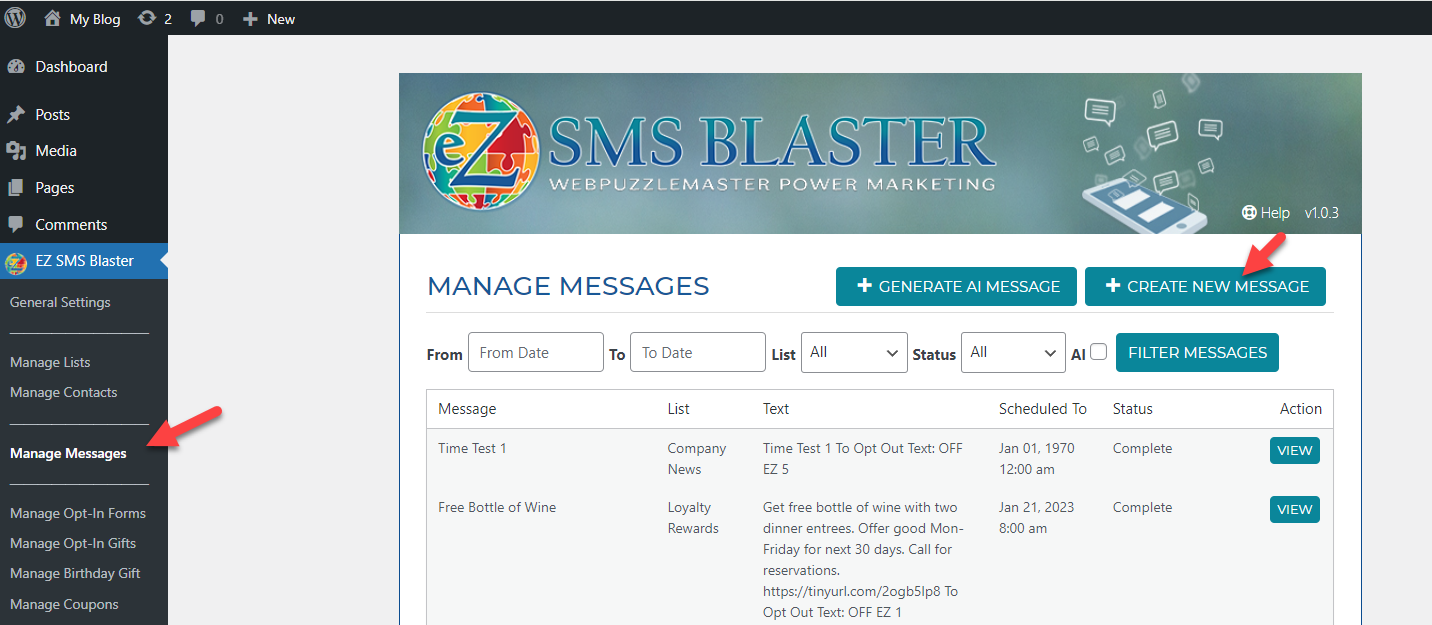
- Messages that are scheduled but not yet running will have edit or delete buttons. A button for creating a new message displays on the top right.
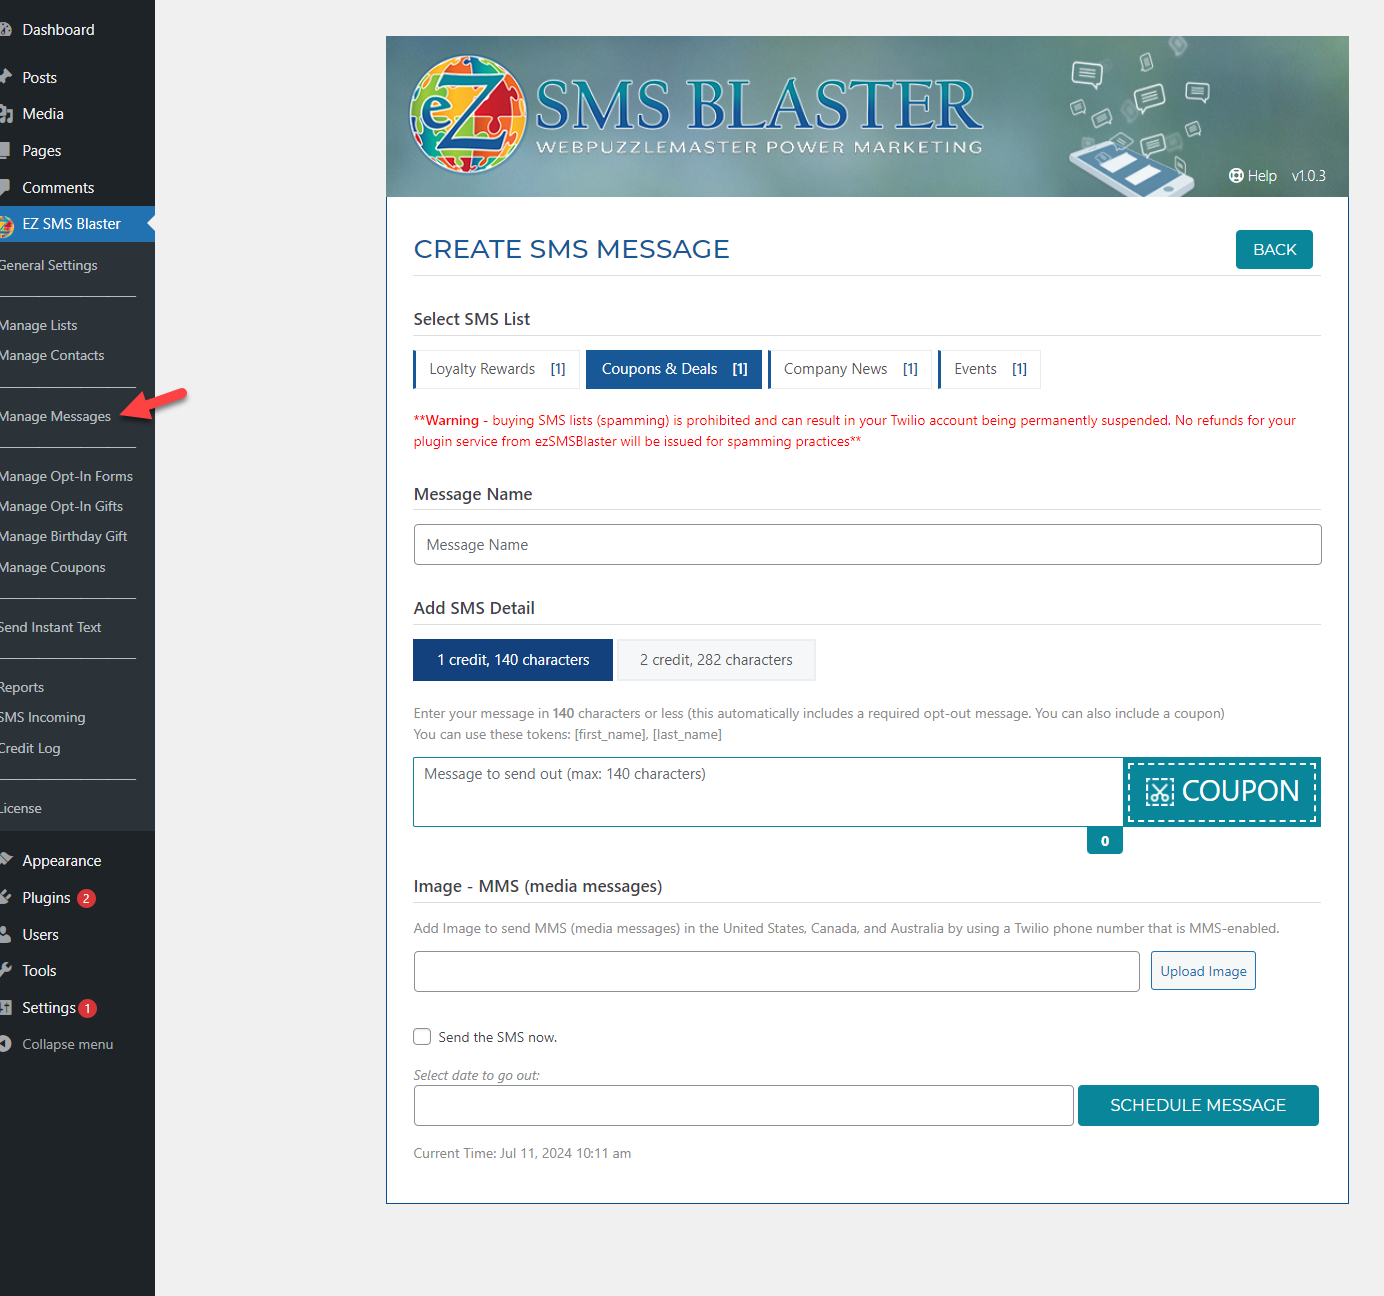
Send out SMS in your choice of 1 or 2 credits (128 characters) for 1 credit or (282 characters) for 2 credits. MMS does not limit you in the number of characters or credits and offers the option to attach an image. All text messages automatically include a required opt-out message at delivery. You also have an option to attach an HTML coupon you have created with the plugin. This will display as a minified link that when clicked by the recipient, will show the coupon with the appropriate call to action. Send SMS immediately or schedule messages to send automatically at strategic times. Follow these steps:
- Select a list for your SMS or MMS message..
- Give your message a name. This is only visible to you and makes it easier to identify messages you may wish to modify later.
- Select 1 credit or 2 for extra-long SMS messages. Disregard for MMS as neither will apply.
- Enter your text message. The character count will display as you type or paste content.
- To send a coupon, click on the coupon button to view all created coupons and select a coupon to attach to your SMS message. Note: if the coupon is beyond the expiration date, it will not allow you to attach that coupon until you modify the date.
- To include an image for MMS, complete the upload image field. It is recommended to attach images that have a small file size. WebP is the recommended file type that will reduce file size without loss of quality.
- Select send now or schedule. Sending now will not give you any opportunity to change your message.
- If scheduling your message, click the calendar icon to select any future date and time for sending your SMS. This includes options to edit and delete your message prior to delivery.
Create an AI Message #
Create high-converting targeted messages with step-by-step AI guidance:
- Sign Up and Get API Key
- Sign up for a free ChatGPT account at ChatGPT and get an API key at OpenAI API Keys.
- Enter the API key in general settings and save.
- Generate AI Message
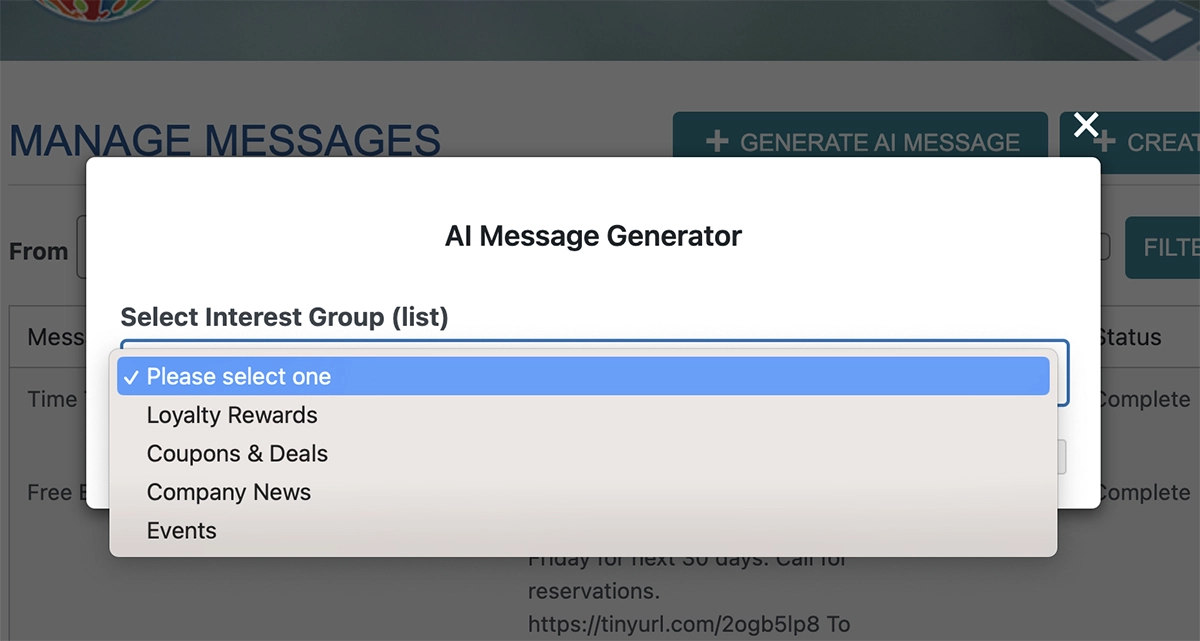
- Go to the manage messages tab and click “Generate AI Message.”
- Step-by-Step Guide
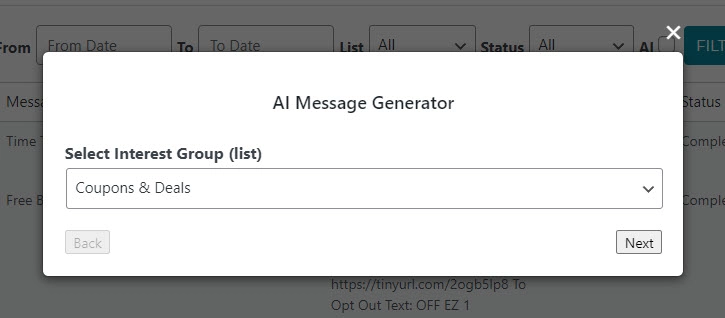
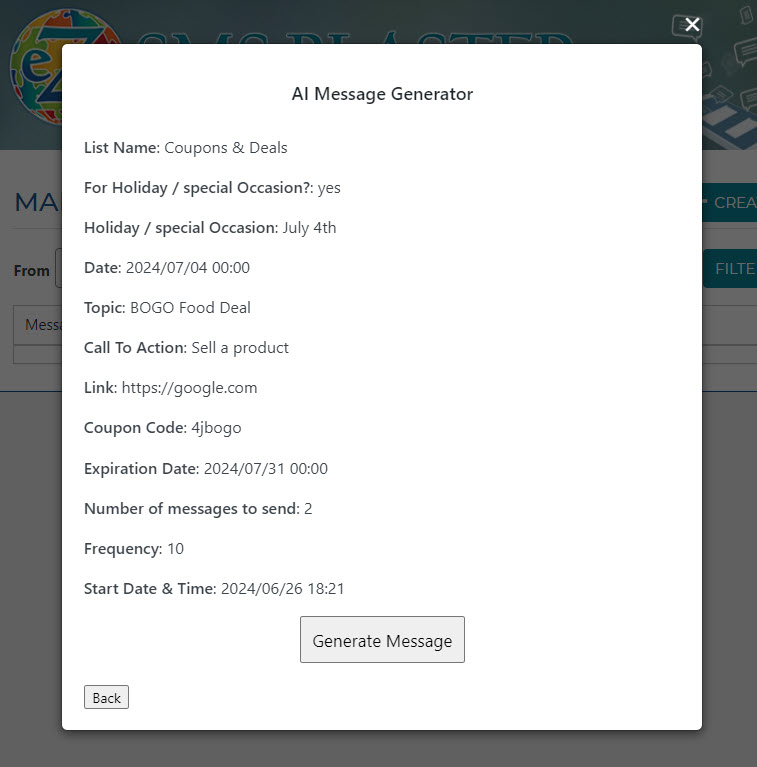
- Select Interest Group: Choose a list with at least one subscriber. Click next.
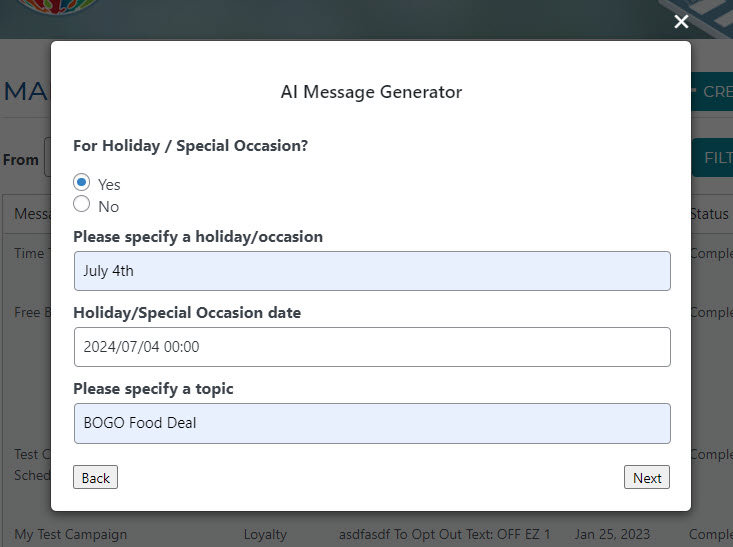
- Holiday/Special Occasion: Answer yes/no. If yes, specify occasion details. If no, specify the topic. Click next.
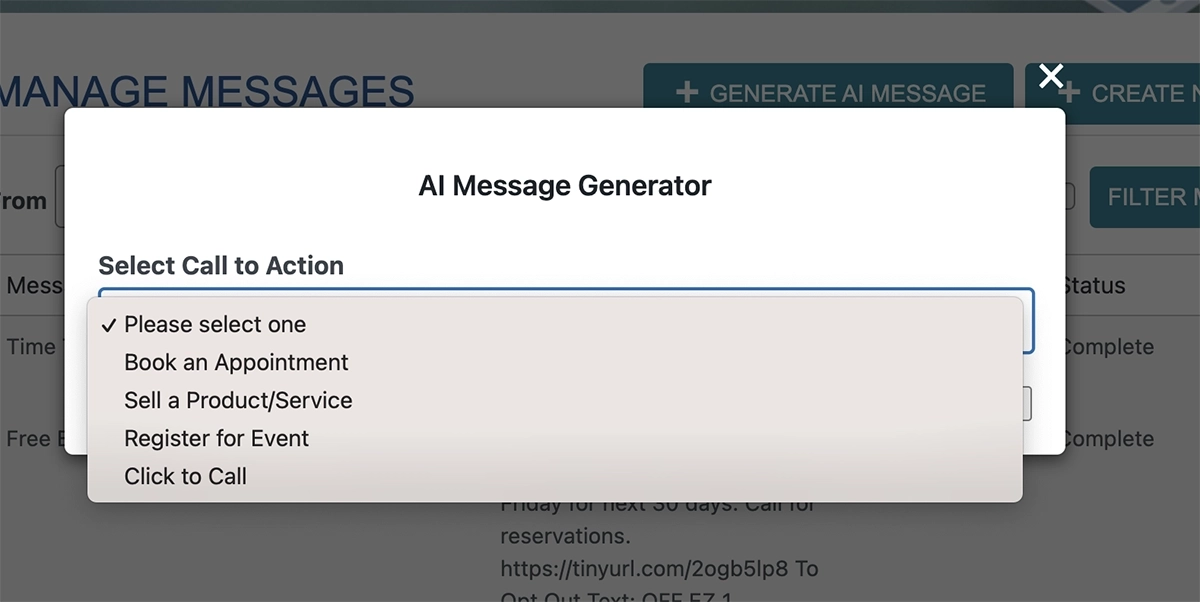
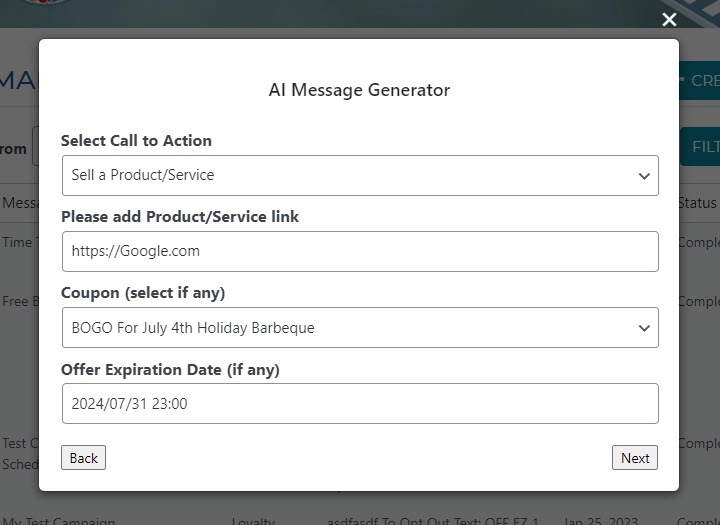
- Call to Action: Select book appointment, sell a product, register for the event, or click to call. Click next.
- Complete Fields: Fill in fields based on the call to action. Click next.
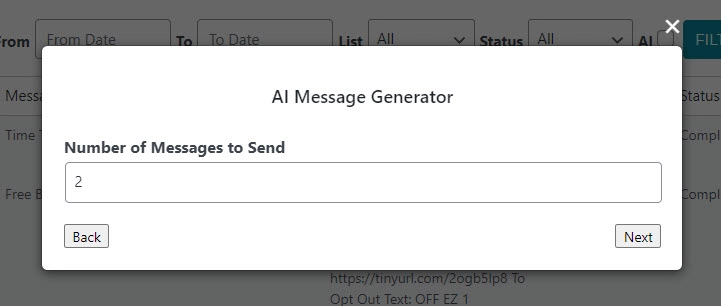
- Number of Messages: Enter the quantity. Click next.
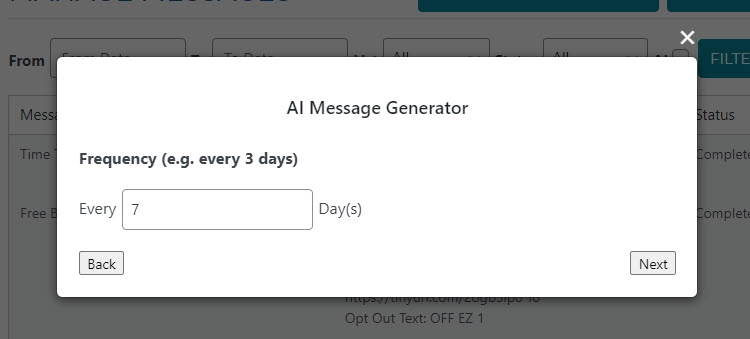
- Message Frequency: Set the frequency. Click next.
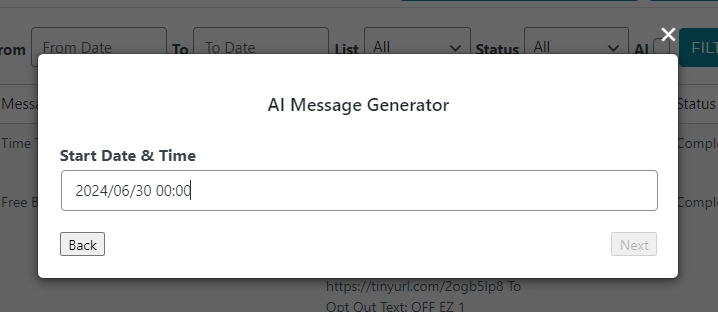
- Start Date/Time: Specify the start date and time. Click next.
- Review and Generate: Review data, make changes if needed, and click “Generate Messages.”
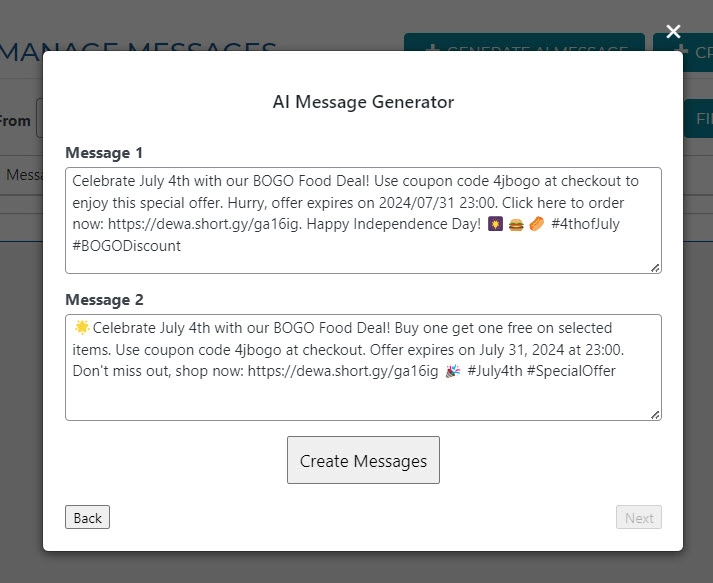
- Review and Create: Review generated messages. If satisfied, click “Create Messages.”
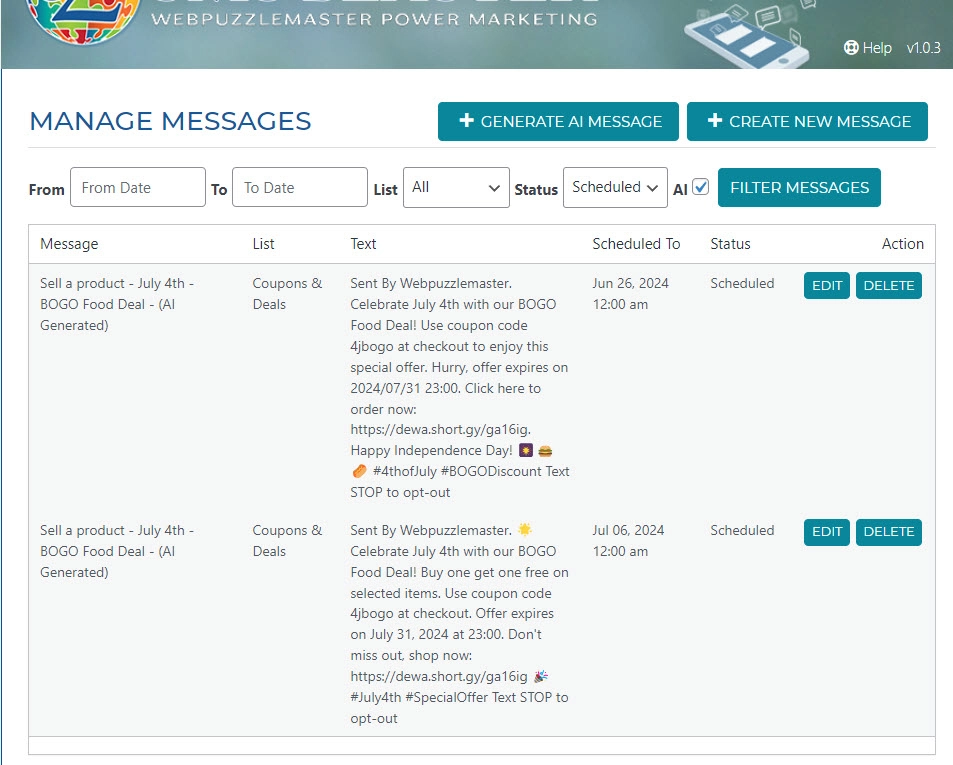
- Manage Messages
- Use filters to find AI and scheduled messages. Options available to edit or delete.
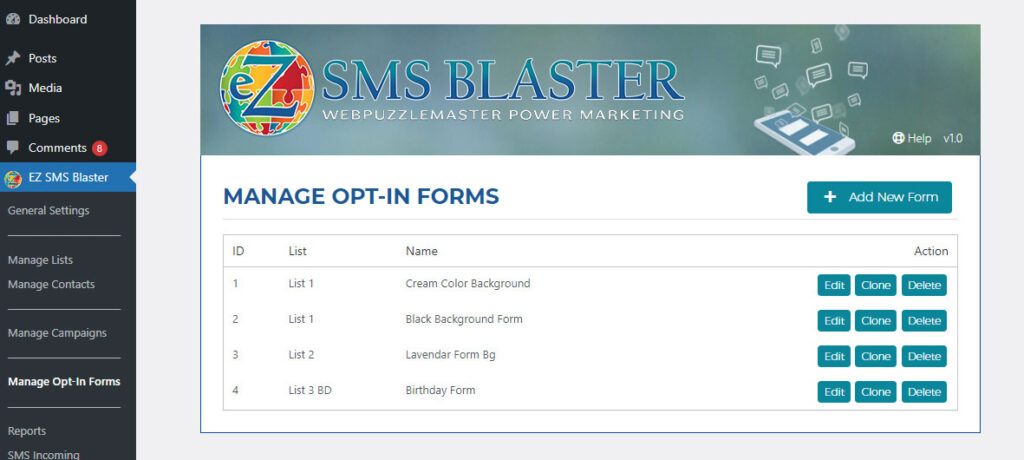
Manage Opt-In Forms #
The Manage Opt-In Forms screen lists all forms you have created. It allows you to view, edit, clone, and delete forms. By giving your forms a descriptive title (only visible to you), it’s easier to identify forms you wish to modify and/or use.
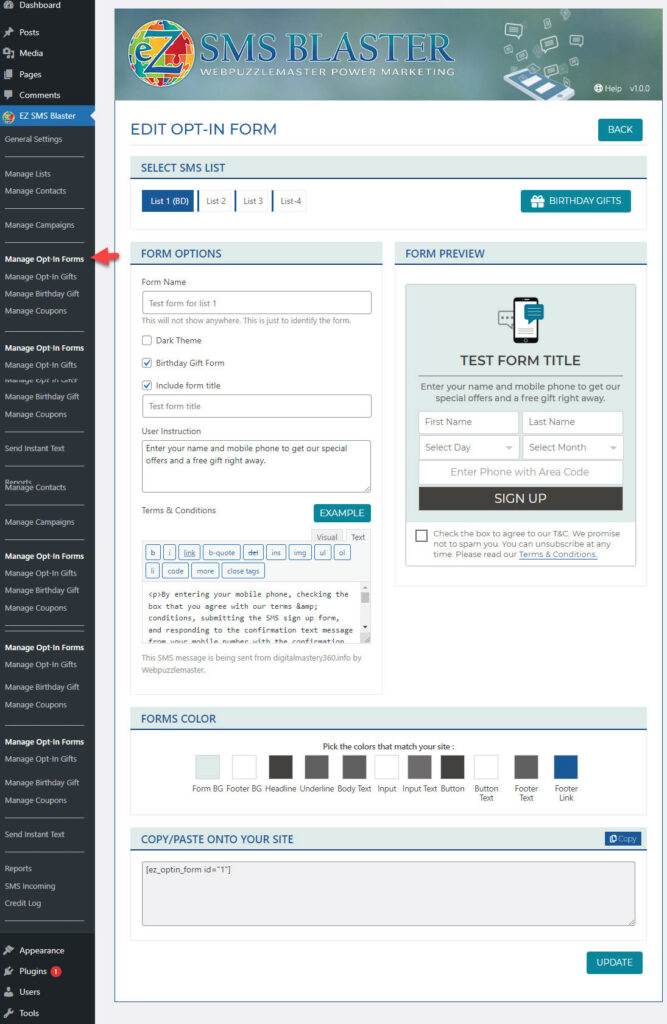
Add a New Form #
Opt-In forms on a well-designed landing page can help you to build substantial targeted lists for acquiring more leads and customers. Fully responsive HTML forms are easy to create and customize with your messaging, colors, and terms. Each form allows you to offer an incentive digital gift that is simple to manage within the plugin. Follow these steps to create a new form:
- Click the button on the top right of manage opt-in forms to add a new form.
- Select a list of subscribers who will opt-in to your form.
- Give your form a descriptive name. This will display on the manage opt-in forms main screen where you can view, edit, clone, or delete a form. This name, visible in the admin only, is useful for finding a form to edit or clone.
- Enter your form title, e.g., Get Our SMS in Your Phone
- Enter the user instruction that displays below the title. Tell subscribers what you want them to do and what they will get, e.g., Enter your info below to get an instant free gift and special offers.
- Add your terms and conditions. Copy an example by clicking the button for Example T&C. The bottom of your T&C will include a non-editable message that incorporates content from settings and says: This SMS message is being sent from [domain] by [company name].
- Style your form by changing colors for background fonts, button, and link.
- Click the Opt-In Gifts button on the top right if you wish to add a digital incentive gift for getting more form opt-ins. Your gift may be a coupon that you create from the plugin. It may be a digital document that you uploaded to your media library and link to it in your gift message.
- Display the form on any page or post of your site by copying and pasting the shortcode where you want the form to display.
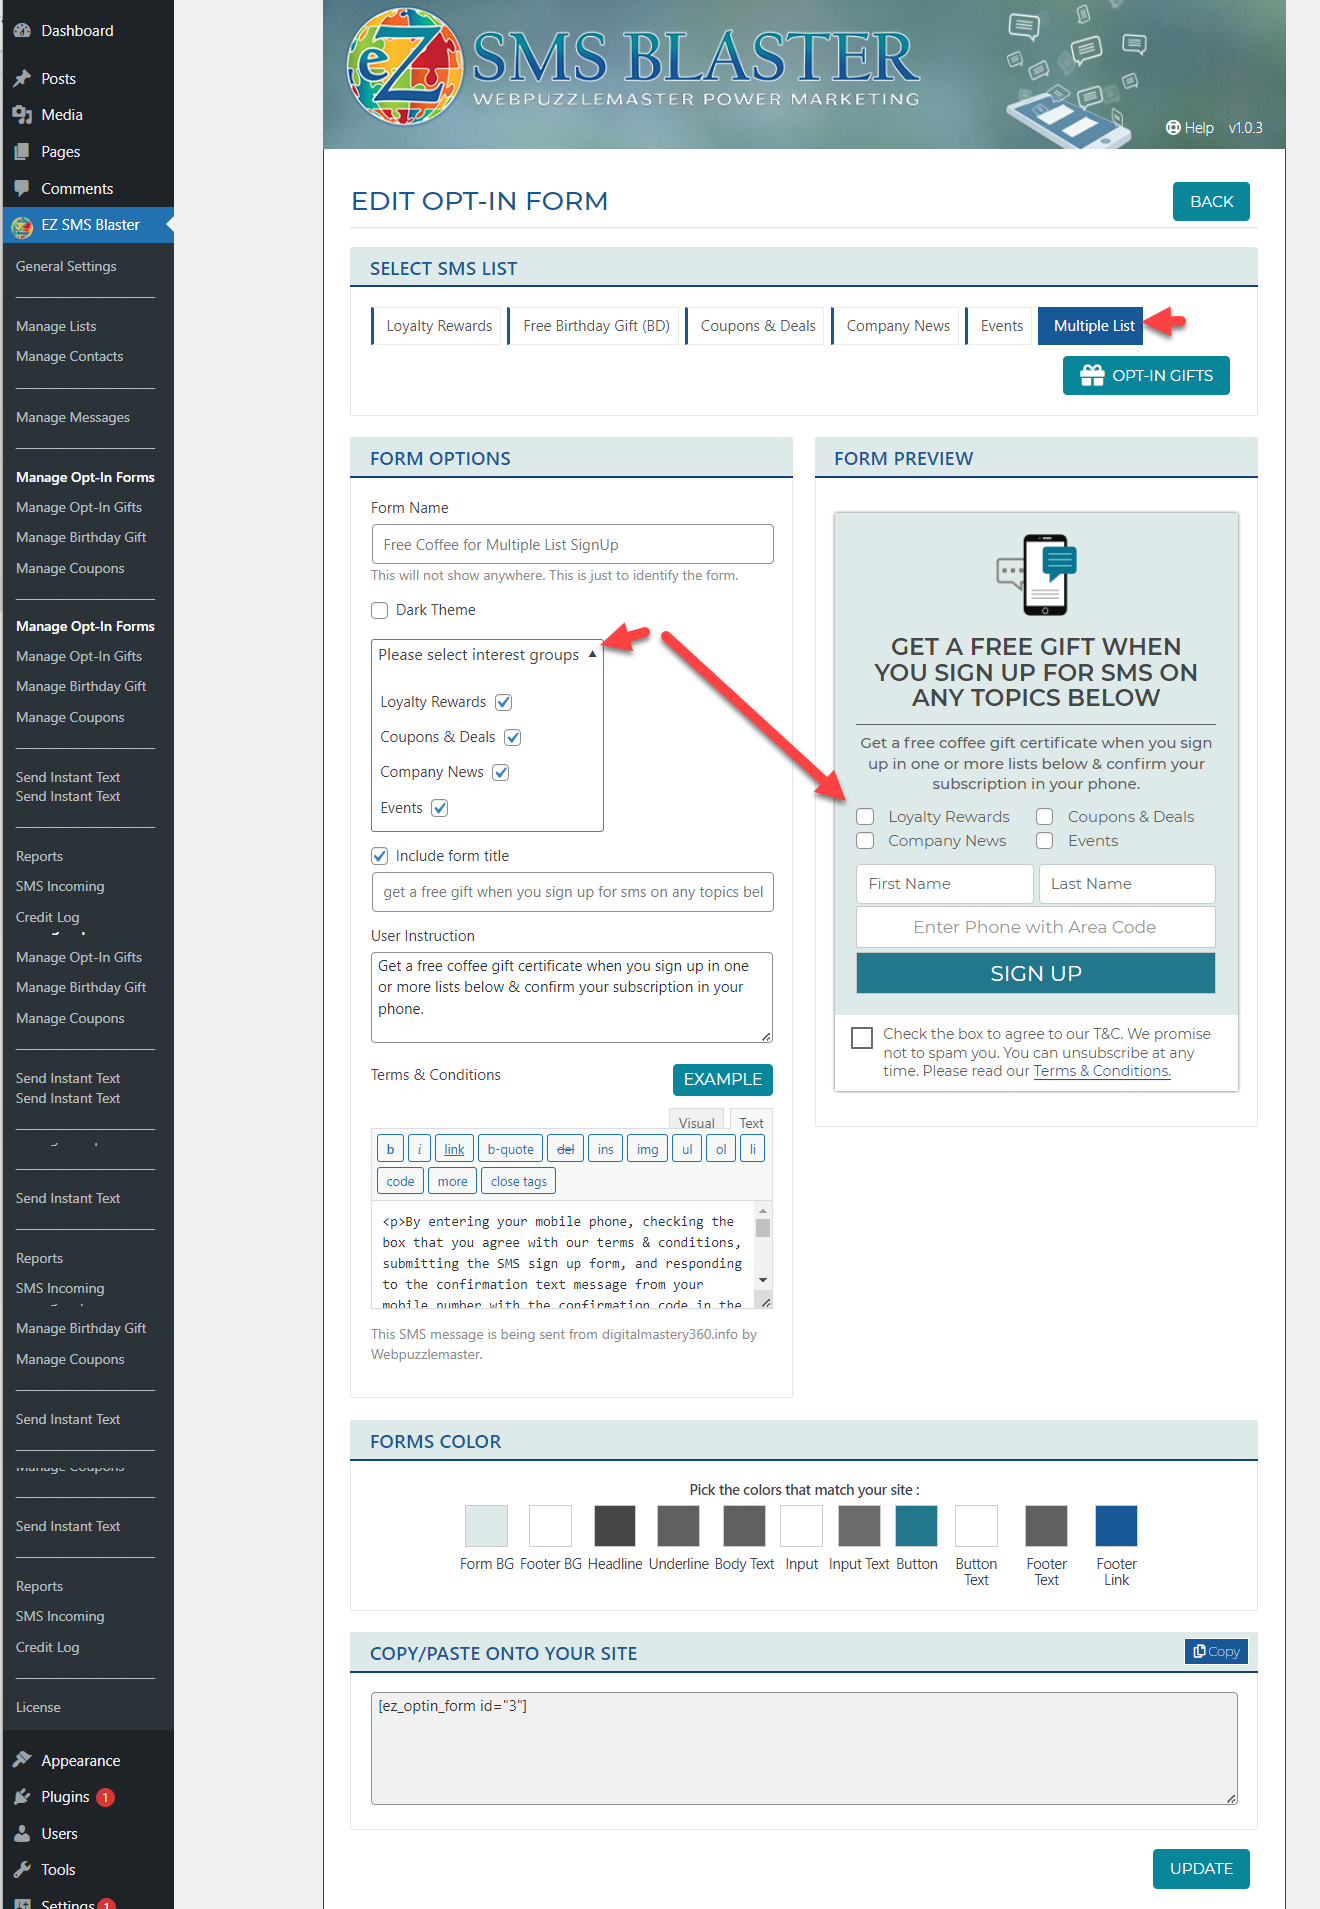
Add a Multi-List Opt-in Form #
A multi-list form allows your users to select any number of interest groups (lists) and double opt-in to all the lists they select at one time. Only lists with one or more contacts are available for the admin to select for inclusion in the form. The admin can create an incentive digital gift to promote subscriptions.
Add your form with short code to any post or page. Include promotional content including subscription benefits, limitation of messages, and assurance of easy opt-out options. Consider advertising your landing page.
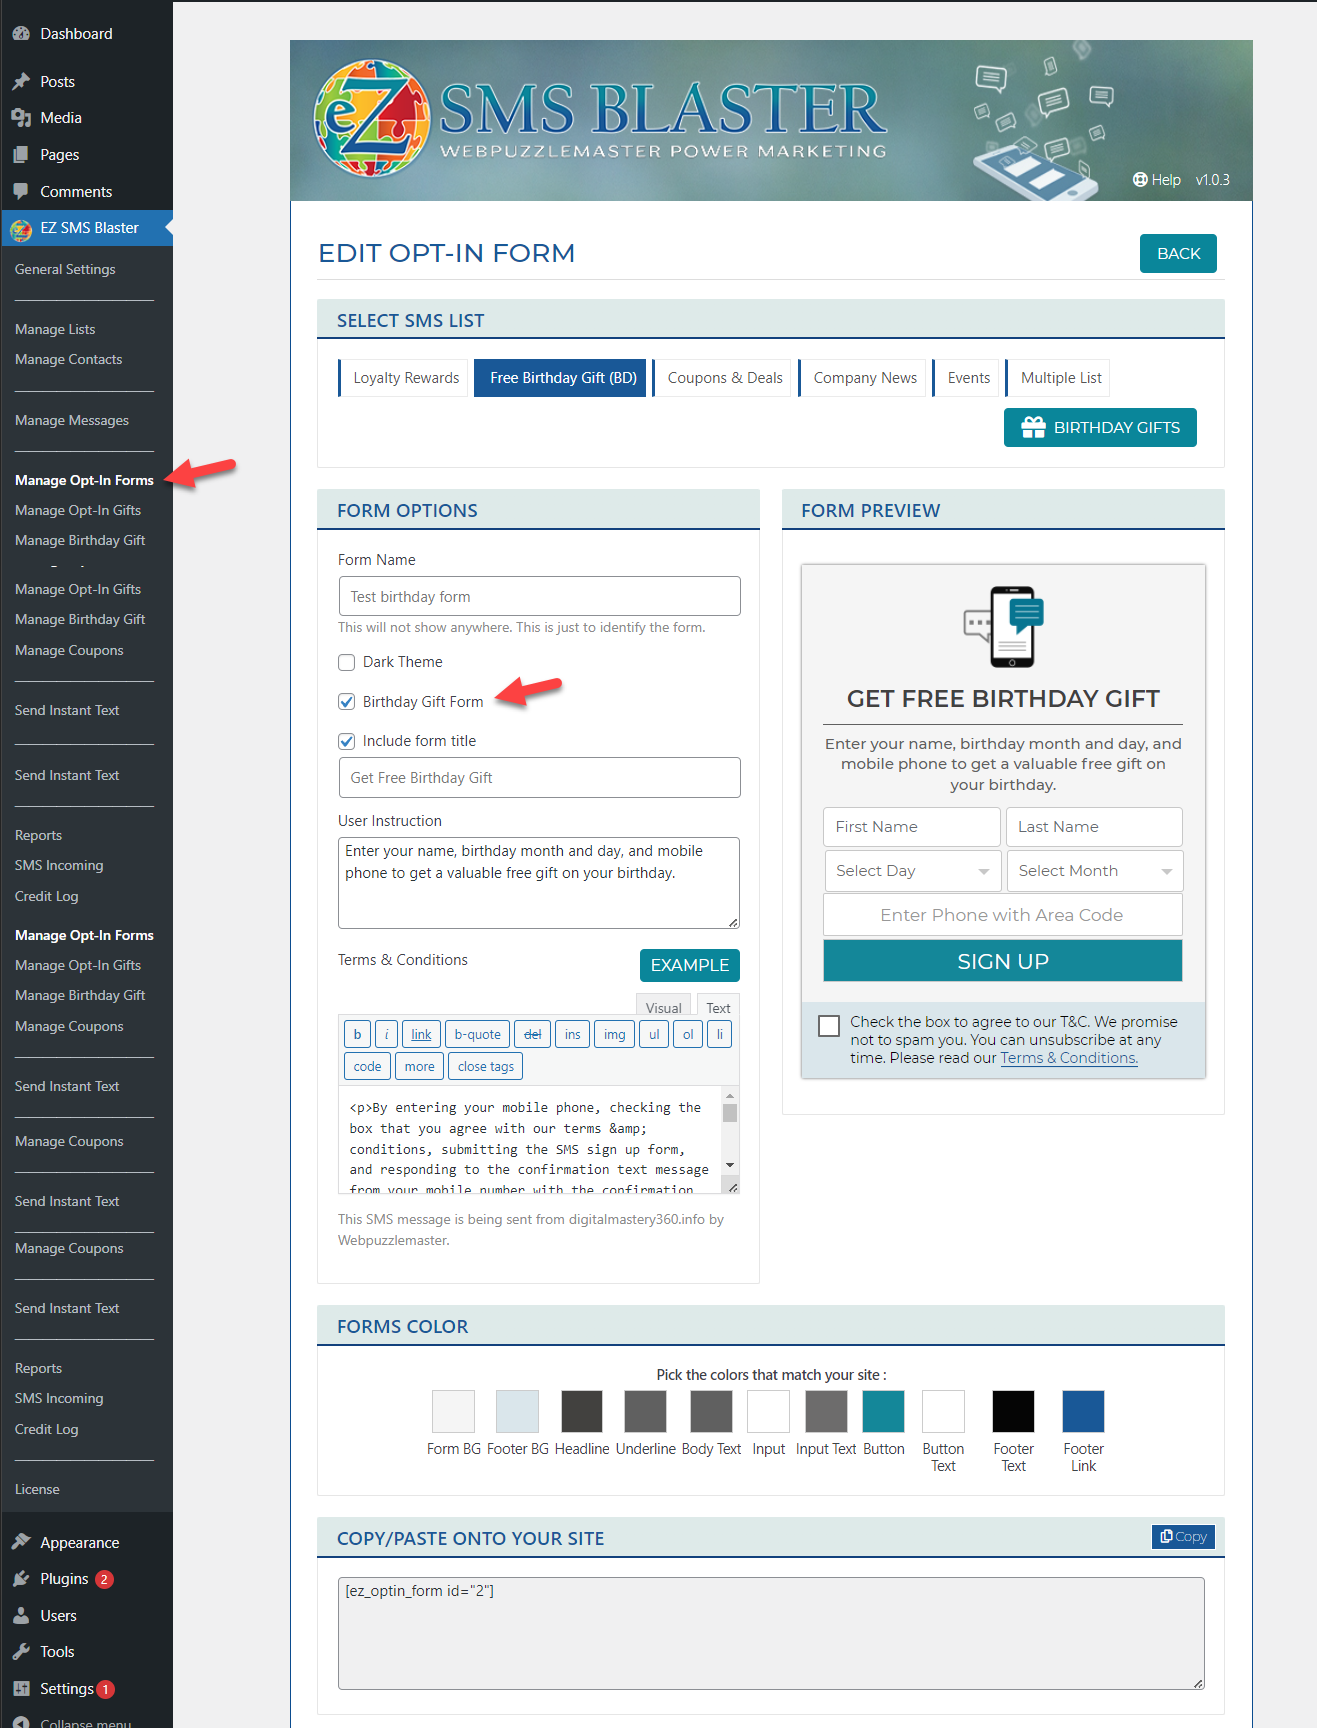
Create a Birthday Form #
A free birthday gift is a powerful incentive for subscribers. Creating a birthday form on an effective landing page can help you to build a substantial targeted list for acquiring more leads and customers. The birthday form consists of fully responsive HTML that is easy to create and customize with your messaging, colors, and terms. From your lists tab, you can create a new list or check a box to designate any existing list as your birthday list. Please note that only one list may serve as your birthday list. It is inadvisable to change your birthday list once created. You may label your birthday list and form with any name as this will only be seen by you. Also, these names can be edited without impacting the subscriber data within the list. Besides the name and phone number fields, the birthday form incorporates the birthday month and day of the subscriber. Then on their birthday, the plugin automatically sends them a text message that includes your birthday gift which may be a media file or coupon generated from the plugin. A top right button allows you to access and manage your birthday incentive digital gift.
Follow these steps to create a new birthday form:
- Create a new list or select an existing list that you wish to designate as your birthday list.
- Check the box next to designate as a birthday list. (Only one list may be a birthday list).
- Go to manage opt-in forms.
- Select your birthday list.
- Give your form a descriptive name. (This will display on the manage opt-in forms main screen where you can view, edit, clone, or delete a form)
- Check the box next to Birthday Gift Form. This will add fields for birthday month and day.
- Enter your form title, e.g., Get Our Free Gift on Your Birthday
- Enter user instruction that displays below the title. Tell subscribers what you want them to do and what they will get, e.g., Sign up and get a free dessert with any entrée purchased during your birthday month. You may prefer to keep your offer more general so that you can change it at any time without disappointing subscribers.
- Add your terms and conditions. Copy an example by clicking the button for Example T&C. The bottom of your T&C will include a non-editable message that incorporates content from settings and says: This SMS message is being sent from [domain] by [company name].
- Style your form by changing colors for background fonts, button, and link.
- Click the Birthday Gift button on the top right to add your SMS message and gift received by birthday subscribers on their birthday. Your gift may be a media file from your media library or a coupon created by the coupon generator in the plugin.
- Add your form with short code to any post or page. Include promotional content including subscription benefits, limitation of messages, and assurance of easy opt-out options. Consider advertising your landing page.
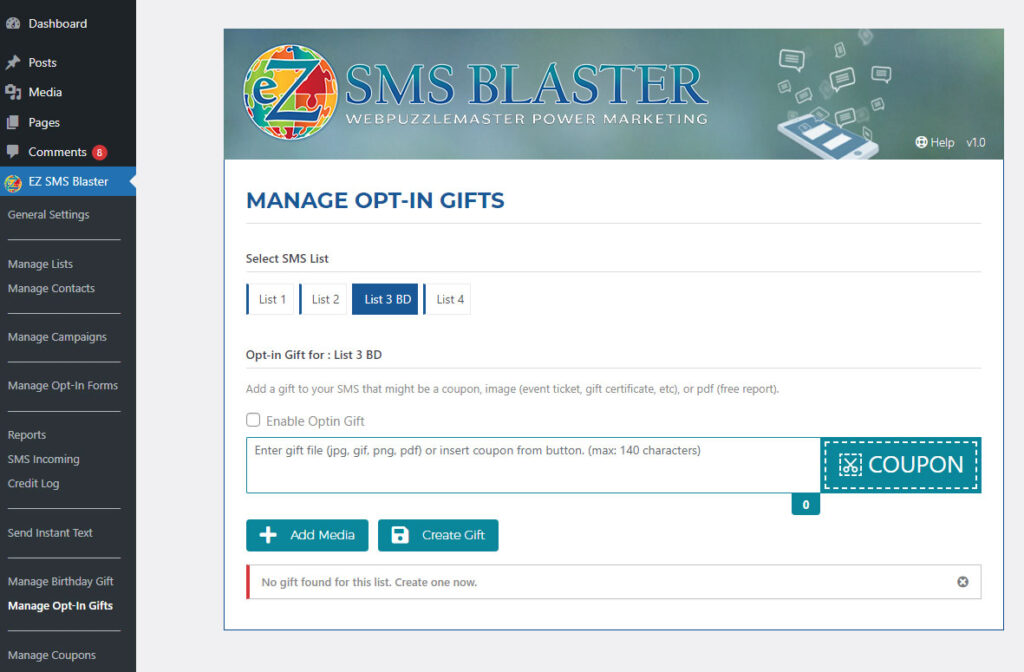
Manage Opt-In Gifts #
Every opt-in form created is associated with a specific list that can be incentivized with a discount or gift. The gifts can be a media file (jpg, gif, png, pdf) or a coupon generated by the plugin that supports HTML. Click the list to add or edit an opt-in gift for that list.
- Select SMS list.
- Add a message to the text field.
- Insert media file or coupon from system (optional).
- Check box to enable opt-in gift.
- Click button to create gift.
- Return to the opt-in form, copy the HTML code, and paste it into any HTML page or post on your website with content to promote your form and offer.
Manage Birthday Gift #
Enter your birthday gift message that includes a description of your gift with T&C and an optional coupon. e.g. Download and present coupon for a [free dinner] during your birthday month compliments of [Your Company Name]. [Insert Coupon]
- Create your text message.
- Click the coupon button to attach a birthday coupon (optional but recommended).
- Check the box to enable birthday gift.
- Uncheck box to disable the gift (remember to remove your opt-in birthday form).
- Click the button to save / update gift.

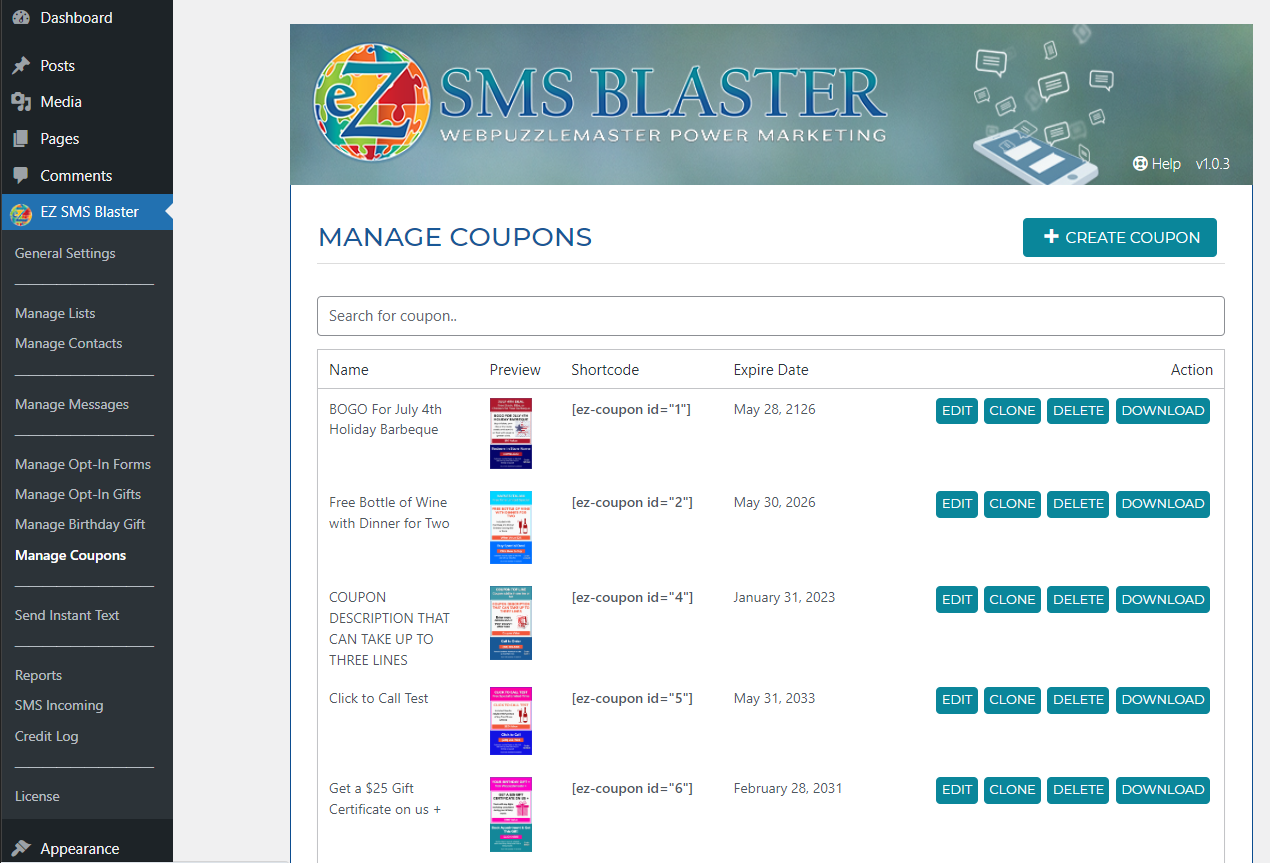
Manage Coupons #
The management of coupons is easy from the Manage Coupons tab. From this tab, view all coupons with name, thumbnail, shortcode, and expiration date. Each coupon provides you an option to edit, clone, delete, and download image. You may also search for a coupon name.
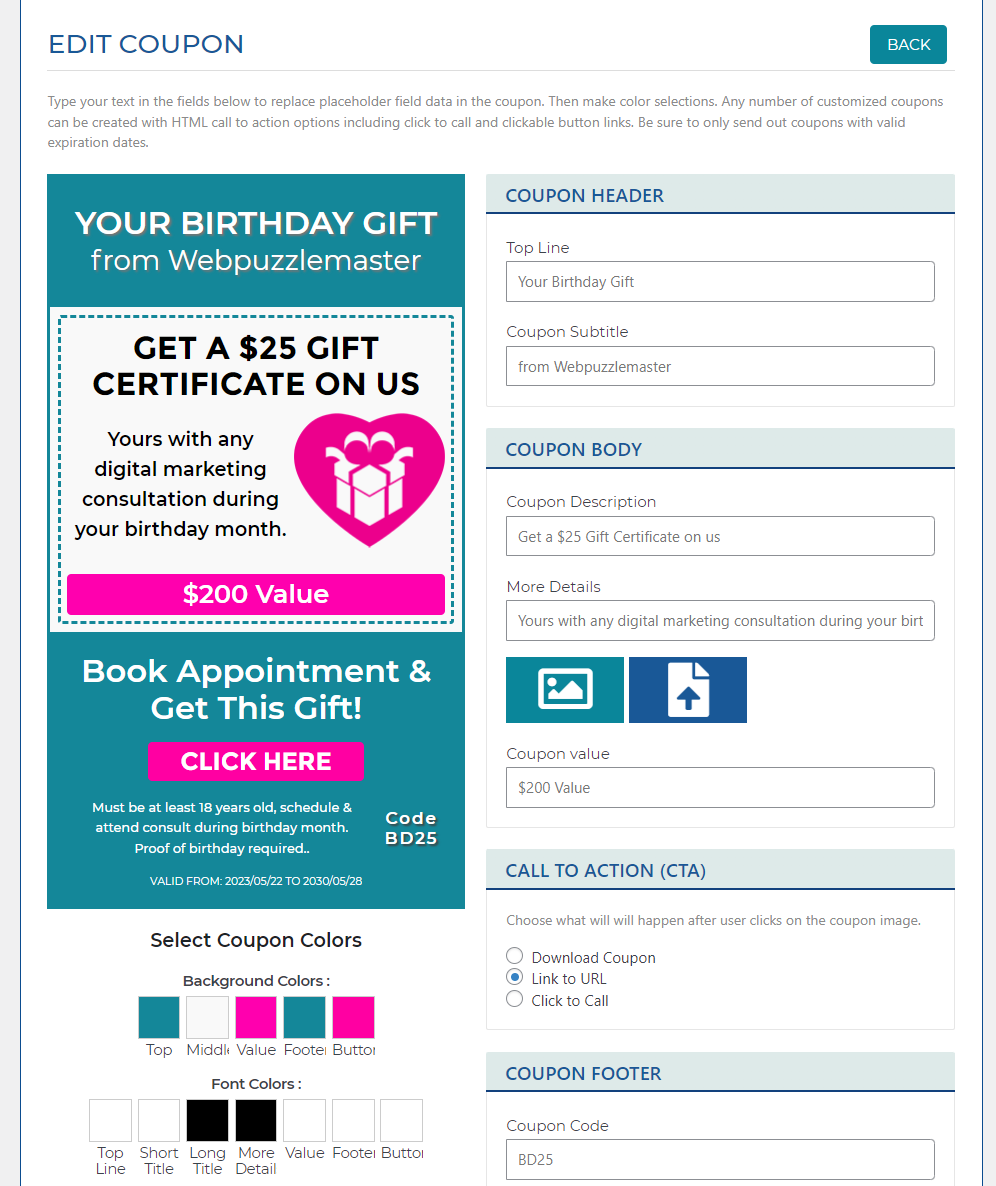
Create/Edit Coupons #
Type your text in the fields below to replace placeholder field data in the coupon. Then make color selections. Any number of customized coupons can be created with HTML and your choice of 3 call to action options. Be sure to only send out coupons with valid expiration dates.
- Coupon Header – Add a short main title (first line) and subtitle (second line)
- Coupon Body – includes coupon description (up to 3 lines), more details, image, and value. Click the image button to select from included icons or upload a 100 px square jpg or png.
- Call to Action options – choose from Click to Call, Link URL, or Download
- Please note, the coupon HTML version is available when the user clicks the coupon link in the SMS message. The coupon will also be downloaded as an image (not HTML) to the appropriate downloads folder for that mobile device.
- When giving a discount coupon for the purchase of a product, be sure to set up the coupon code in your cart. The code should correspond with the discount code on the coupon and should be valid for the effective date range.
- Coupon Footer – Include coupon code (6 characters maximum), call to action fields based on CTA options selected, and start and end date. Selecting the end date first will help to avoid problems with date range selections.
- Terms & Conditions – specify terms and conditions for your coupon.
- Manage Coupon Colors – modify any coupon colors you wish to change. To change colors, click the color squares under the label for background colors and font colors. Then select a color from the color palate or enter a hexadecimal color code.
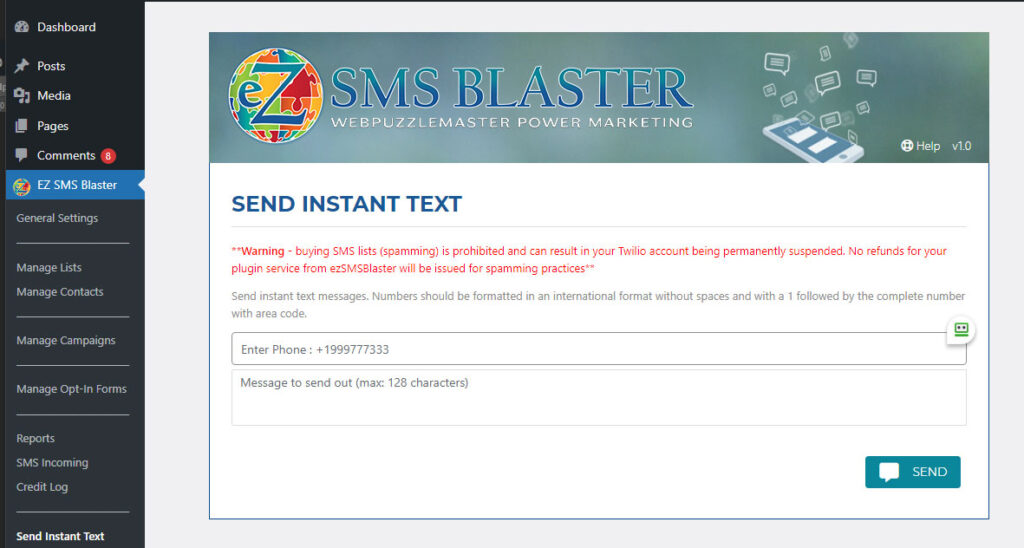
Send Instant Text #
This field allows you to send instant text to a single recipient. Numbers should be formatted in an international format without spaces and with a (country code) followed by the complete number with area code. e.g. +12392814355
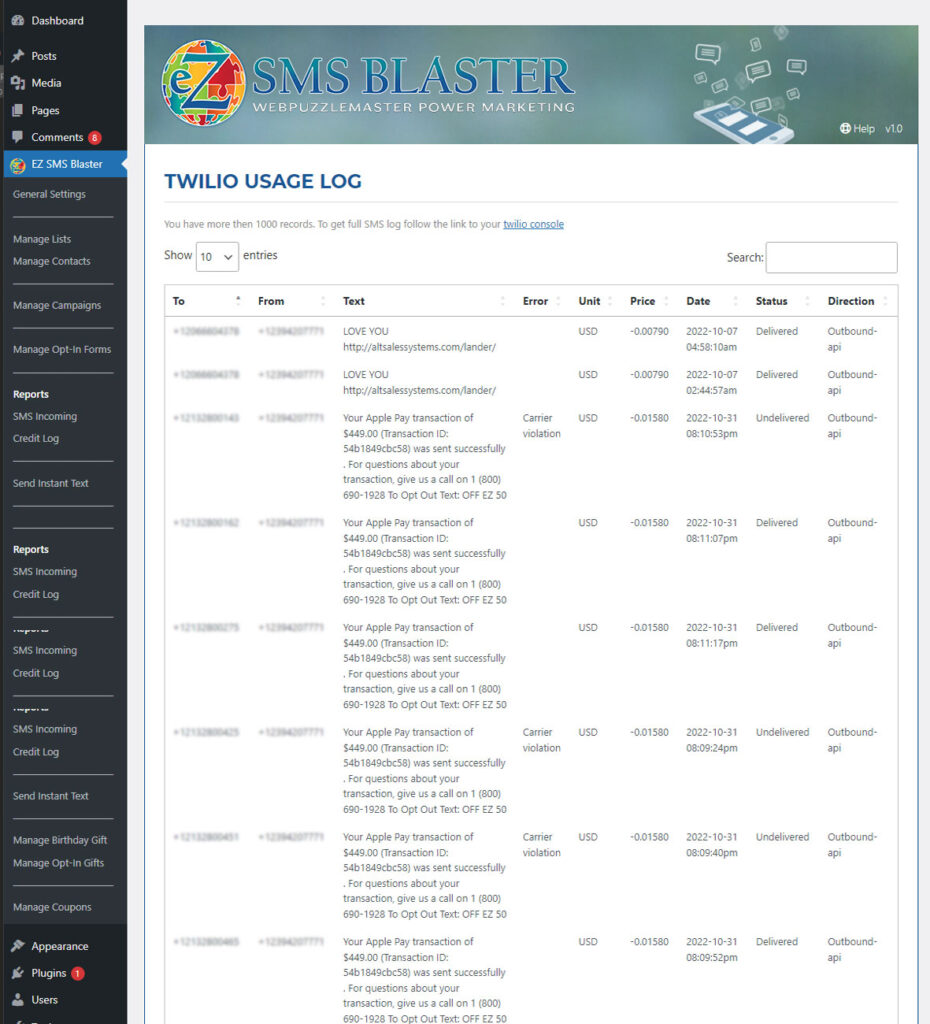
Reports #
Usage reports may be available from a data feed (API) integrated from your carrier account if available. Not all carriers offer this API. We do, however, provide you with a direct link to reports within your account so that you can easily obtain this usage information. If available, the 1st 1000 records will display from this tab. Follow the link to your console to get data about additional records. Please also note that your Manage Campaigns tab will provide you with detailed information for each of your campaigns that you can filter by list, delivery status, and date range.